SSL Handshake
In Two-Way SSL authentication, the client and server need to authenticate and validate each others identities. The authentication message exchange between client and server is called an SSL handshake, and it includes the following steps:
- A client requests access to a protected resource.
- The server presents its certificate to the client.
- The client verifies the server's certificate.
- If successful, the client sends its certificate to the server.
- The server verifies the client’s credentials.
- If successful, the server grants access to the protected resource requested by the client.
In step 5 (above), the server validates the client, which is the second part of the Two-Way SSL (Mutual Authentication) process. This is typically done by making sure that the client certificate is valid (non-expired and issued by a trusted Certificate Authority), as well as the client’s digital signature is valid. The digital signature is produced using the private key from the client. Anyone that has the public key can validate the digital signature. (However, only the client that has the private key can create a valid signature.)
Establishing SSL Connection
To establish a Two-Way SSL (Mutual Authentication) connection, you must have the following:
Client Side
- private key
- client certificate
- Visa Developer Platform Root Certificate, and
- Visa Developer Platform Intermediate Certificate
- DigiCert Root Certificate
- DigiCert Intermediate Certificate (optional)
DigiCert Root/Intermediate Certificates
The DigiCert Global Root certificate is available for download at https://cacerts.digicert.com/DigiCertGlobalRootG2.crt.pem (PEM) and https://cacerts.digicert.com/DigiCertGlobalRootG2.crt (binary).
The Intermediate certificate is available for download at https://cacerts.digicert.com/DigiCertGlobalG2TLSRSASHA2562020CA1-1.crt.pem and https://cacerts.digicert.com/DigiCertGlobalG2TLSRSASHA2562020CA1-1.crt (binary).
Windows Certificate Management Users: Download the binary (.crt) version of the certificate and open it or right-click and select Install Certificate and follow the instructions in the Certificate Wizard to save the file to your trust store.
Obtaining a Two-Way SSL Certificate
The following sections explain how to obtain a private key, client certificate, and certificate authority root certificate. You will also learn about how to bundle the certificates into keystores, using Java keytool or OpenSSL.
In order to obtain a valid client certificate from Visa Developer, you must submit a Certificate Signing Request (CSR). The CSR file contains client registration details (such as Organization Name and Locality), as well as the public key from the client. The process of creating the CSR yields the CSR file itself and also a private key (which corresponds to a public key, which is encoded into the CSR file). There are multiple tools that you can use to create a CSR, such as Java keytool or OpenSSL. Both tools are available for free to download from the Internet for all major operating systems.
Refer to one of the following sections on how to obtain a Two-Way SSL certificate.
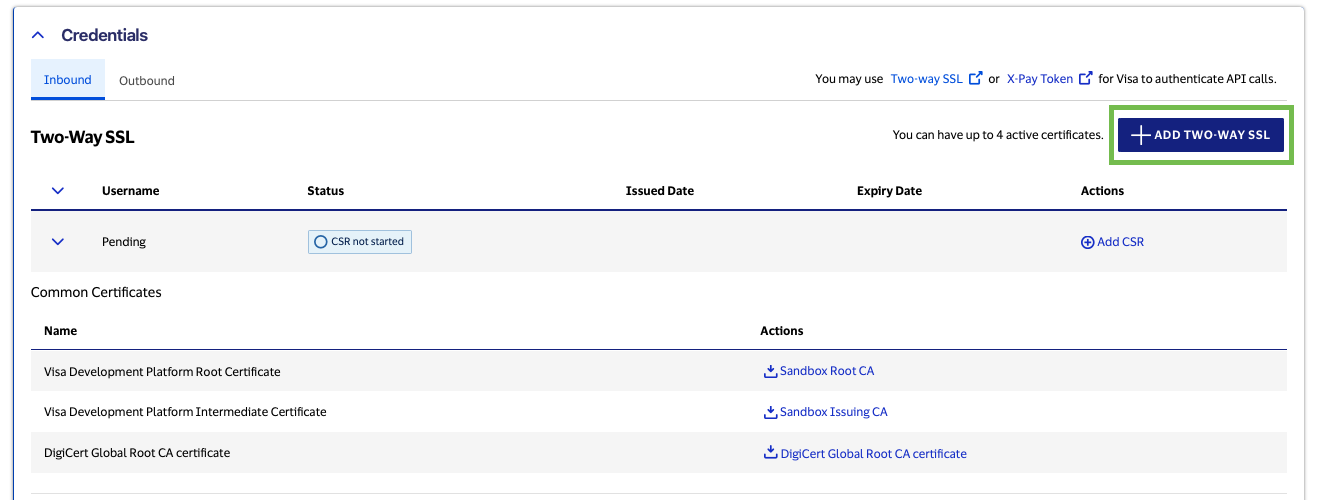
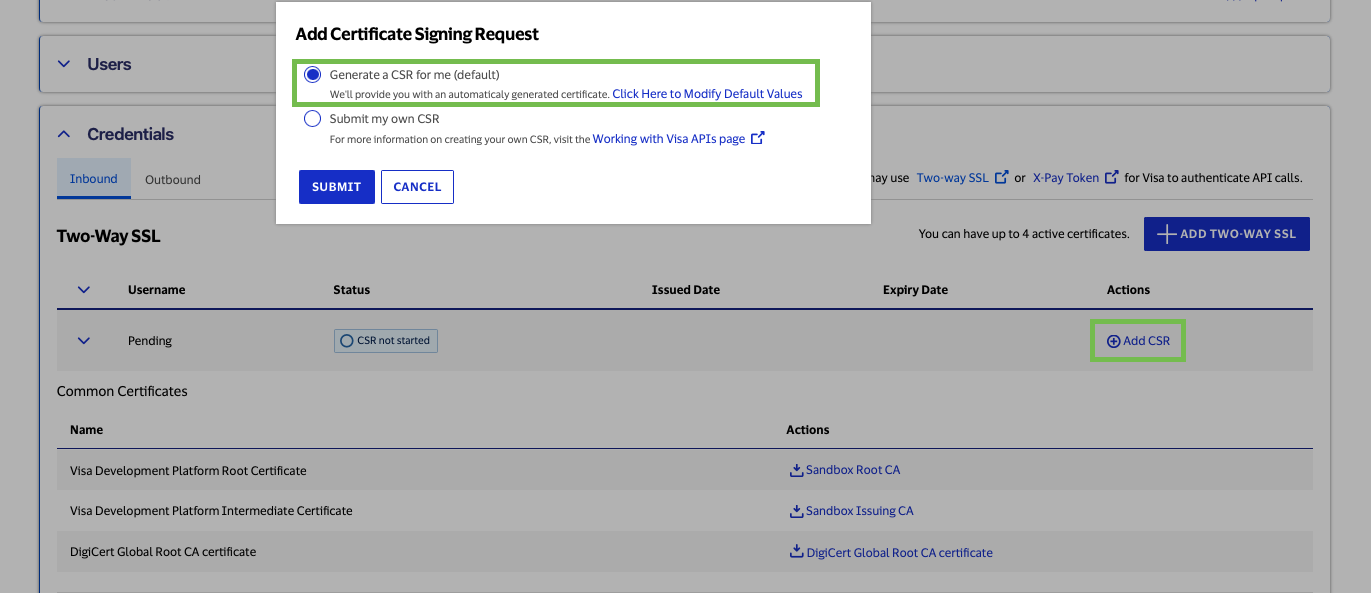
Configuring a Two-Way SSL Keystore Using an Auto-generated CSR (Sandbox)
In the Sandbox environment, there are two methods for Adding a Certificate Signing Request to a project. By selecting “Generate a CSR for me (default),” Visa Developer will provide you with an automatically generated certificate based on default values. You can also choose to create and upload your own CSR by selecting “Submit my own CSR.”
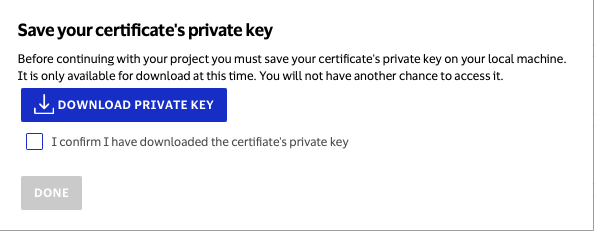
Download the private key to your local machine. Once you have made sure it is saved to your computer, please confirm and click done.
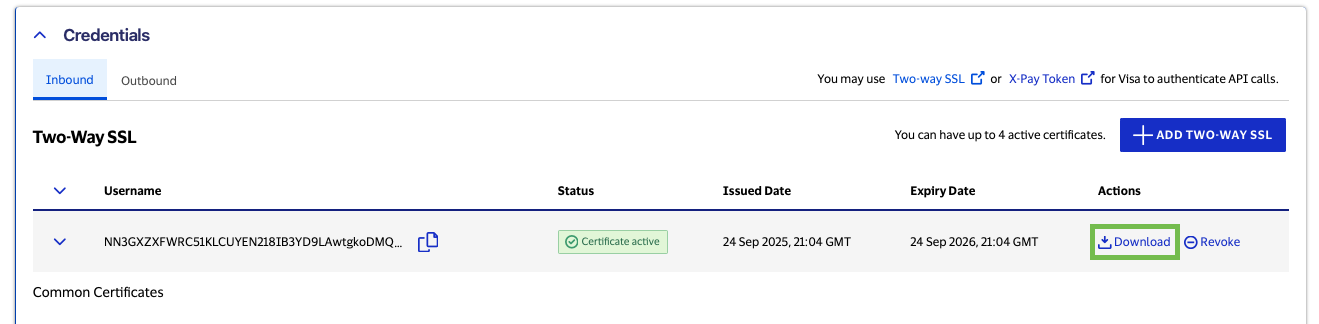
Now you should be able to see the active certificate under the "Two-Way SSL" tab. Click the "download" button to download the certificate file.
Configuring a Two-Way SSL Keystore Using an Auto-generated CSR (Certification and Production)
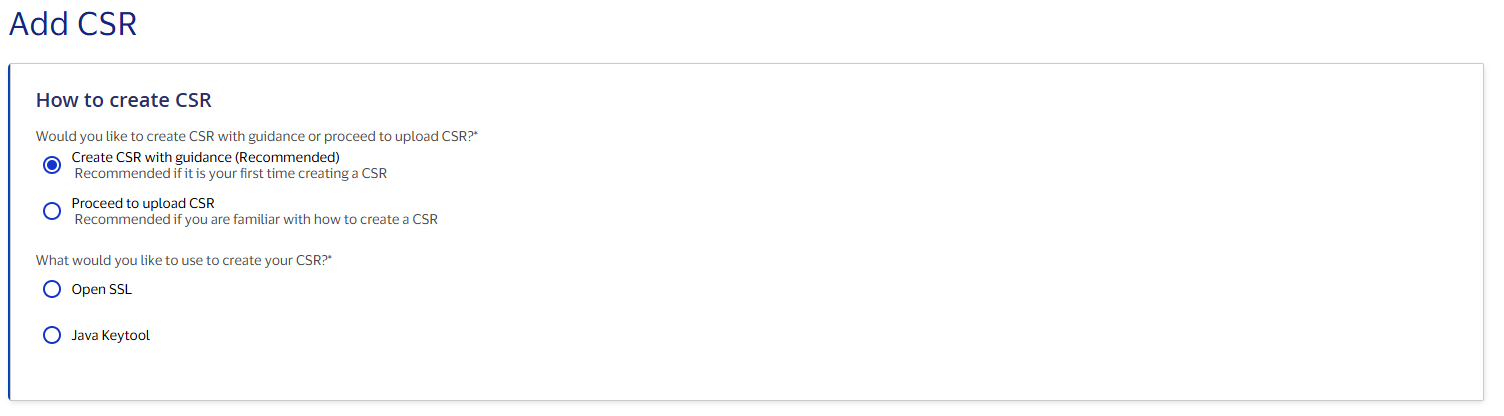
In Certification and Production environments, there are two methods for Adding a Certificate Signing Request to a project. By selecting “Create CSR with guidance (Recommended),” Visa Developer will guide you through the CSR generation process in steps. This option is recommended if it is your first time creating a CSR. You may also choose to create and upload your own CSR by selecting “Proceed to upload CSR.”
The CSR Wizard helps you create a Certificate Signing Request (CSR) by pre-filling most of the required fields with information from your project.
To create a CSR, select either "OpenSSL" or "Java Keytool."
Check that all the CSR Wizard fields are entered in accordance with the CSR Field Descriptions.
Then click "Generate Commands" to create the scripts you will use to generate either the JKS and CSR file (if you selected Keytool) or the key pair and CSR File (if you selected OpenSSL).
Run the generated commands to create the CSR file.
CSR Field Descriptions
| Field Name | Description |
Private key file name Or JKS file name |
Name of the Private key file when using Open SSL or JKS file when using Java Keytool |
| CSR file name | Name of the CSR file |
| Common Name (CN) | This field must be a fully qualified domain name and must identify the company. Format should be hostname.domainname.com. This cannot have wildcard characters for hostname and hostname should not be www. For example: services.company.com |
| Organization Name (O) | Name of your organization. For example: Bank of USA |
| Organizational Unit (OU) | Name of your division within your organization. For example: Debit Card Processing Unit. |
| Country (C) | Two-letter International Standards Organization (ISO) 3166-1 country code. For example: US |
| State (ST) | Name of the state or province where the server is located. Spell out the name completely (do not abbreviate). For example: California |
| Locality/City (L) | A valid city name. Spell out the name completely (do not abbreviate). For example: San Francisco |
| UID | This should be the CSR Unique Id appended with ”-CERT” or “-PROD” to indicate the environment:
To get the CSR Unique ID, go to the dashboard, select the environment in the left side navigation, and go to the "Credentials" section. |
After running the commands to create the CSR file, you should be able to upload the file from your local machine to Visa Developer. Once you successfully upload the CSR file, you should be able to see the active certificate under the "Two-Way SSL" tab.
Creating Key Stores
Place your private key file (for example: privateKey.pem and your certificate file from VDP (for example: cert.pem in the same directory. Generate a keystore (for example: myProject_keyAndCertBundle.p12) file as shown below.
Note: The myProject_keyAndCertBundle.p12 is only a placeholder file name. You may choose to name it anything else.
> openssl pkcs12 -export -in cert.pem -inkey "privateKey.pem" -certfile cert.pem -out myProject_keyAndCertBundle.p12
If you need a Java Key Store, run the following Java keytool command to convert your P12 file into a JKS file.
> keytool -importkeystore -srckeystore myProject_keyAndCertBundle.p12 -srcstoretype PKCS12 -destkeystore myProject_keyAndCertBundle.jks
Run the following Java keytool command to validate the contents of your new JKS file.
> keytool -list -v -keystore myProject_keyAndCertBundle.jks
Run the following command to add the root certificate to your JKS file.
> keytool -import -alias ejbca -keystore myProject_keyAndCertBundle.jks -file VDPCA-SBX.pem -storepass <password>
Run the following command to add digicert to your JKS file.
> keytool -import -alias digicert -keystore myProject_keyAndCertBundle.jks -file DigiCertGlobalRootCA.crt -storepass <password>
Configuring Two-Way SSL Keystore Using Your Own CSR - OpenSSL
OpenSSL is an open source software library that implements Secure Sockets Layer (SSL) and Transport Layer Security (TLS) protocols, as well as provides basic cryptographic functions and various utilities.
See below for a command-line utility, which is freely available for download from the Internet for all major operating systems.
1.
To generate a CSR and private key, run the command shown below from the command line. The command will prompt you for Country Name, State Name, Locality Name, Organization Name, Organization Unit Name, Common Name, and Email Address. For example, notice the output from the resulting files--one is the private key (privateKey.pem) and the other is the CSR (certreq.csr).
> openssl req -new -keyout privateKey.pem -out certreq.csr
Generating a 2048 bit RSA private key
…
Writing a new private key to ‘privatekey.pem’
Enter PEM pass phrase: <your_password>
Verifying – Enter PEM pass phrase: <re-enter your password>
You are about to be asked to enter information that will be incorporated into your certificate request.
What you are about to enter is what is called Distinguished Name or DN.
For some fields there will be a default value.
If you enter ‘.’, the field will be left blank
Country Name (2 letter code): <country name>
State or Province Name (full name):<state name>
Locality Name (eg, city):<city name>
Organization Name (eg, company):<organization name>
Organizational Unit Name (eg, section):<department/section name>
Common Name (eg, your name or your server`s hostname):<host name>
Email Address []:<email address>
Please enter the following 'extra' attributes to be sent with your certificate request A challenge password:.
An optional company name:
Note: For all fields, only the following ACSII characters are allowed.
- Space character
- Upper case, A to Z
- Lower case, a to z
- Digits, 0 to 9
- Dash (-)
CSR Field Descriptions
| Field Name | Description |
Private key file name Or JKS file name |
Name of the Private key file when using Open SSL or JKS file when using Java Keytool |
| CSR file name | Name of the CSR file |
| Common Name (CN) | This field must be a fully qualified domain name and must identify the company. Format should be hostname.domainname.com. This cannot have wildcard characters for hostname and hostname should not be www. For example: services.company.com |
| Organization Name (O) | Name of your organization. For example: Bank of USA |
| Organizational Unit (OU) | Name of your division within your organization. For example: Debit Card Processing Unit. |
| Country (C) | Two-letter International Standards Organization (ISO) 3166-1 country code. For example: US |
| State (ST) | Name of the state or province where the server is located. Spell out the name completely (do not abbreviate). For example: California |
| Locality/City (L) | A valid city name. Spell out the name completely (do not abbreviate). For example: San Francisco |
| UID | This should be the CSR Unique Id appended with ”-CERT” or “-PROD” to indicate the environment:
To get the CSR Unique ID, go to the dashboard, select the environment in the left side navigation, and go to the "Credentials" section. |
2.
Upload your CSR file to Visa Developer.
In response, Visa Developer will create your client certificate and the Visa Developer CA Root Certificate. Download both the Visa Developer Certificate (Root CA) and certificate (client cert) to a local folder.
Note: You should see both VDPCA-SBX.pem and cert.pem in your local folder.
3.
Create the PKCS12 (P12) Certificate Store Using OpenSSL.
In order to invoke Two-Way SSL with a majority of the non-java platforms, you will need the PKCS12 keystore, which is described below. Check your SSL library documentation, as some platforms accept the key and the certificate directly. If this is the case, you can skip this step.
Note: The PKCS12 (P12) files can be imported into the Windows keystore using the Windows certificate import utility. This action will be invoked automatically when you double-click a P12 file.
Place your private key file (for example: privateKey.pem) and your certificate file from VDP (for example: cert.pem) in the same directory.
Run the following OpenSSL command to create the P12 certificate store containing your private key and your client certificate.
1.
Generate a keystore (for example: myProject_keyAndCertBundle.p12) file as shown below.
> openssl pkcs12 -export -in cert.pem -inkey "privateKey.pem" -certfile cert.pem -out myProject_keyAndCertBundle.p12
Note: The myProject_keyAndCertBundle.p12 file is only a placeholder file name. You may choose to name it anything you choose.
2.
View and validate the contents of your P12 certificate store by executing the following OpenSSL command.
> openssl pkcs12 -info -in myProject_keyAndCertChainBundle.p12
The resulting file, called myProject_keyAndCertBundle.p12 will contain both your private key and your client certificate.
Note: The Visa Developer sandbox does not validate the VDP root CA, so you do not have to include it in your P12 keystore. However, the root certificate is required when you create your Java Key Store, because you cannot add the client certificate to the JKS file without the root certificate. During the actual SSL handshake, the VDP sandbox does not validate the root certificate, so both JKS with the root cert and P12 without the root certificate will work equally well.
Configuring Two-Way SSL Keystore Using Your Own CSR - Java Keytool
Keytool is a certificate management utility that is part of the standard Java distribution.
If you use a JKS file as your truststore, follow the instructions below to add the DigiCert Global Root CA certificate to your truststore.
1.
Download the DigiCert Global Root CA certificate from https://dl.cacerts.digicert.com/DigiCertGlobalRootCA.crt to your local folder.
2.
Backup your truststore JKS file as a safeguard.
3.
Then, run the following keytool command to add it your truststore
keytool -import -alias DigiCertGlobalCA -keystore <Path to JKS (TrustStore) file> -file DigiCertGlobalRootCA.crt

import org.apache.http.conn.ssl.SSLConnectionSocketFactory;
import org.apache.http.impl.client.CloseableHttpClient;
import org.apache.http.impl.client.HttpClients;
import org.apache.http.ssl.SSLContexts;


import javax.net.ssl.SSLContext;
import java.io.File;
import java.io.IOException;
import java.security.KeyManagementException;
import java.security.KeyStoreException;
import java.security.NoSuchAlgorithmException;
import java.security.UnrecoverableKeyException;

import java.security.cert.CertificateException;

….
private CloseableHttpClient createHttpClient() throws KeyManagementException, UnrecoverableKeyException, NoSuchAlgorithmException, KeyStoreException, CertificateException, IOException {


    return HttpClients.custom().setSSLSocketFactory(getSSLSocketFactory()).build();

}

private SSLConnectionSocketFactory getSSLSocketFactory() throws KeyManagementException, UnrecoverableKeyException, NoSuchAlgorithmException, KeyStoreException, CertificateException, IOException {

    SSLConnectionSocketFactory sslSocketFactory = new SSLConnectionSocketFactory(loadSSLContext(),

            new String[]{"TLSv1.2"}, null, SSLConnectionSocketFactory.getDefaultHostnameVerifier());

    return sslSocketFactory;
}

private SSLContext loadSSLContext() throws KeyManagementException, UnrecoverableKeyException,

        NoSuchAlgorithmException, KeyStoreException, CertificateException, IOException {

    SSLContext sslcontext = SSLContexts.custom()

            .loadKeyMaterial(new File(VisaProperties.getProperty(Property.KEYSTORE_PATH)),

                    VisaProperties.getProperty(Property.KEYSTORE_PASSWORD).toCharArray(),

                    VisaProperties.getProperty(Property.PRIVATE_KEY_PASSWORD).toCharArray())

            .loadTrustMaterial(new File(VisaProperties.getProperty(Property.TRUSTSTORE_PATH)),

                    VisaProperties.getProperty(Property.TRUSTSTORE_PASSWORD).toCharArray())

            .build();

    return sslcontext;
}
To generate a CSR using keytool:
1.
Generate a keystore file that contains public/private key pair (for example: 'clientkeystore.jks'), as shown below, using RSA, a keysize of 2048, and a password. Keytool manages everything through the Java Key Store (JKS).
keytool -genkeypair -alias client -keyalg RSA -keysize 2048 -keystore clientkeystore.jks -storepass <password> -keypass <password> -dname "CN=<common name>, OU=<organizational unit>, O=<organization name>, L=<city/locality name>, ST=<state name>, C=<country name>"
Note: For all fields, only following ACSII characters are allowed.
- Space Character
- Upper case A to Z
- Lower case a to z
- Digits 0 to 9
- Dash (-)
CSR Field Descriptions
| Field Name | Description |
Private key file name Or JKS file name |
Name of the Private key file when using Open SSL or JKS file when using Java Keytool |
| CSR file name | Name of the CSR file |
| Common Name (CN) | This field must be a fully qualified domain name and must identify the company. Format should be hostname.domainname.com. This cannot have wildcard characters for hostname and hostname should not be www. For example: services.company.com |
| Organization Name (O) | Name of your organization. For example: Bank of USA |
| Organizational Unit (OU) | Name of your division within your organization. For example: Debit Card Processing Unit. |
| Country (C) | Two-letter International Standards Organization (ISO) 3166-1 country code. For example: US |
| State (ST) | Name of the state or province where the server is located. Spell out the name completely (do not abbreviate). For example: California |
| Locality/City (L) | A valid city name. Spell out the name completely (do not abbreviate). For example: San Francisco |
| UID | This should be the CSR Unique Id appended with ”-CERT” or “-PROD” to indicate the environment:
To get the CSR Unique ID, go to the dashboard, select the environment in the left side navigation, and go to the "Credentials" section. |
2.
Generate the Certificate Signing Request (for example: 'certreq.csr') file from your Java Key Store as shown below. Be sure to copy the User ID and Password because you will need these to invoke APIs with Two-Way SSL.
keytool -certreq -alias client -keystore clientkeystore.jks -storepass <password> -keypass <password> -file certreq.csr
You now have the Java Key Store file (which contains your private key) and the CSR file.
Certificate (root CA) and the certificate (client cert) to a local folder. You should see both VDPCA.pem and cert.pem in your local folder.
3.
Update Java Key Store with Root Certificate and Client Certificate using Java Keytool.
To invoke an API using Two-Way SSL, you must have a client certificate and your root CA in your keystore, since your Java SSL library only accepts one input for all certificates – the keystore. Therefore, you will need to add the certificates downloaded from VDP to the keystore (for example: clientkeystore.jks) that you generated while creating the CSR.
To add a project-specific certificate to the keystore:
1.
Add the VDP CA Root Public Certificate to the keystore:
keytool -import -alias ejbca -keystore clientkeystore.jks -file VDPCA-Sandbox.pem -storepass <password>
Note: Replace the < password > above with the actual password that was used while creating the clientkeystore.jks.
Click yes when prompted to trust the certificate option.
2.
Add the project specific certificate to the keystore:
keytool -import -alias client -keystore clientkeystore.jks -file cert.pem -storepass <password>
The resulting file, called clientkeystore.jks will contain your private key, your client certificate and your VDP CA root certificate.
Testing Two-Way SSL Connectivity Using SOAPUI
SOAPUI is a free and open source Web Service Functional Testing solution. With an easy-to-use graphical user interface, SOAPUI allows client developer's the ability to rapidly create and execute web service API functional tests. Visa recommends that client developers use SOAPUI or a similar connectivity tool to establish initial connection to the VDP sandbox.
Configuring SOAP UI Two-Way SSL Preferences
In order to configure Two-Way SSL, you must create the Certificate Signing Request (CSR) and use Visa Developer to obtain the VDP root CA and project specific certificate. The certificates and the private key need to be bundled together into a keystore (either Java Key Store or PKCS12 keystore), as described in the Configuring 2-way SSL Keystore section.
Once the keystore file is available, follow these steps to configure SOAPUI Two-Way SSL preferences.
1.
Download SoapUI 5.4 from http://www.soapui.org
2.
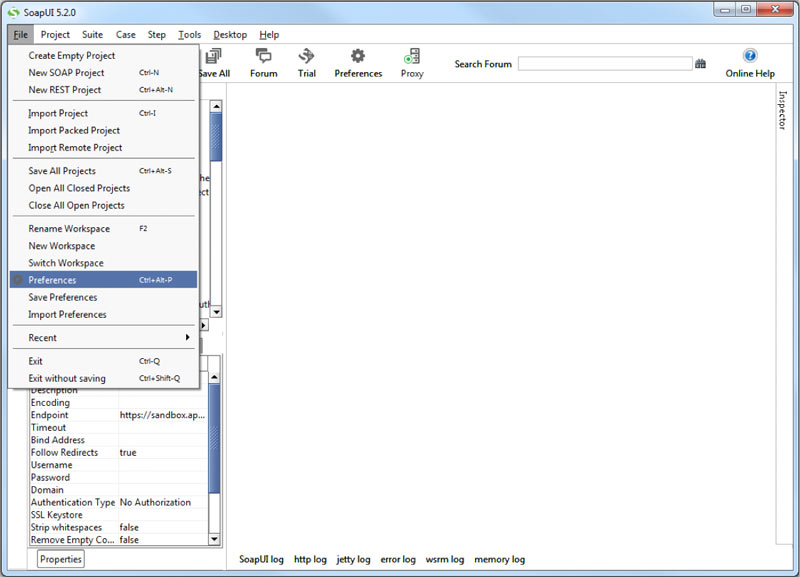
Once installed, open SOAPUI and go to File > Preferences as shown:
3.
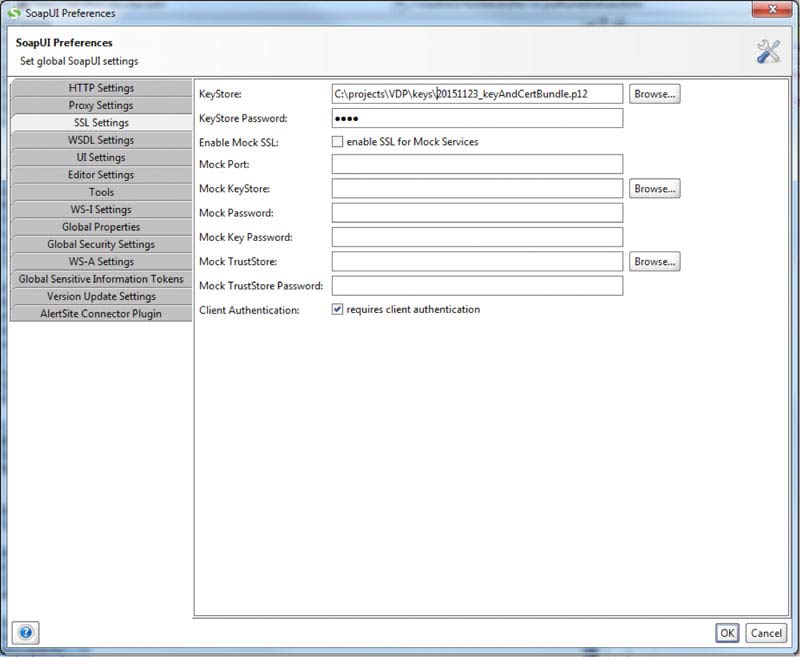
Select the SSL Preferences tab, browse to your keystore file (either JKS or P12 file), and provide the keystore password. Make sure to check the requires client authentication checkbox below.
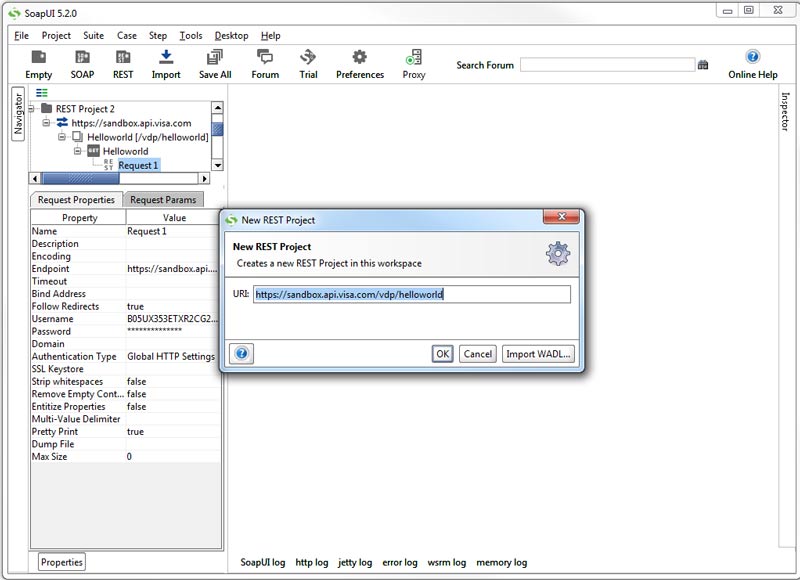
Creating a Helloworld REST Project
Once in SOAPUI, click Project > New REST Project. Then, provide the following helloworld URI in the URI field:
https://sandbox.api.visa.com/vdp/helloworld
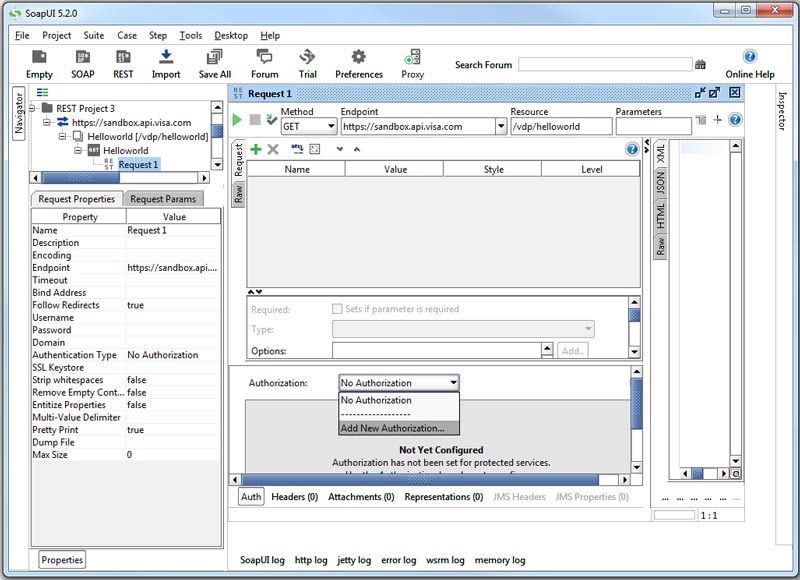
Configuring the Helloworld API Request and Testing the Connection
1.
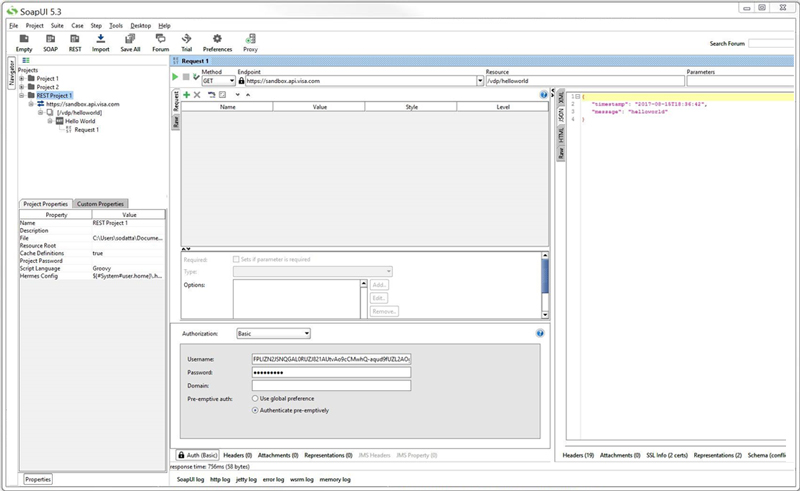
Fully expand the newly created REST project and double click Request 1 (this will automatically open when the project is created successfully). Select the Auth tab to add HTTP basic authorization.
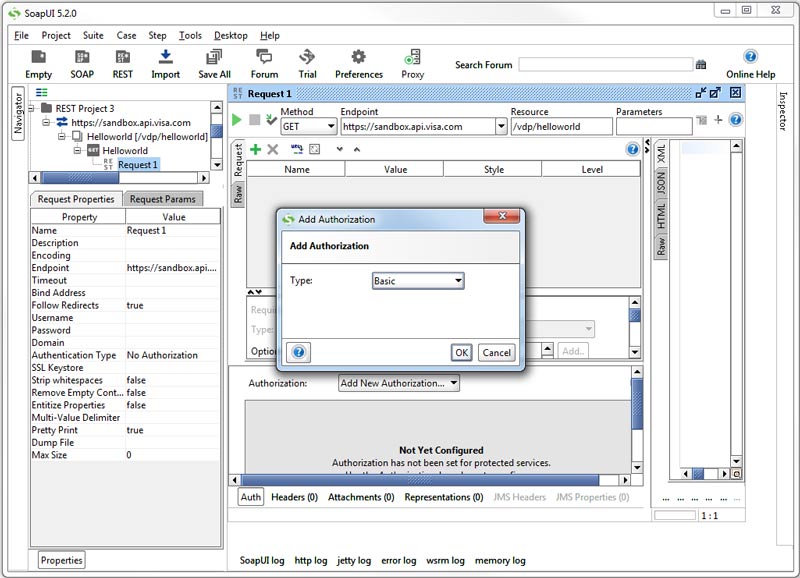
2.
Select authorization type as Basic and click OK.
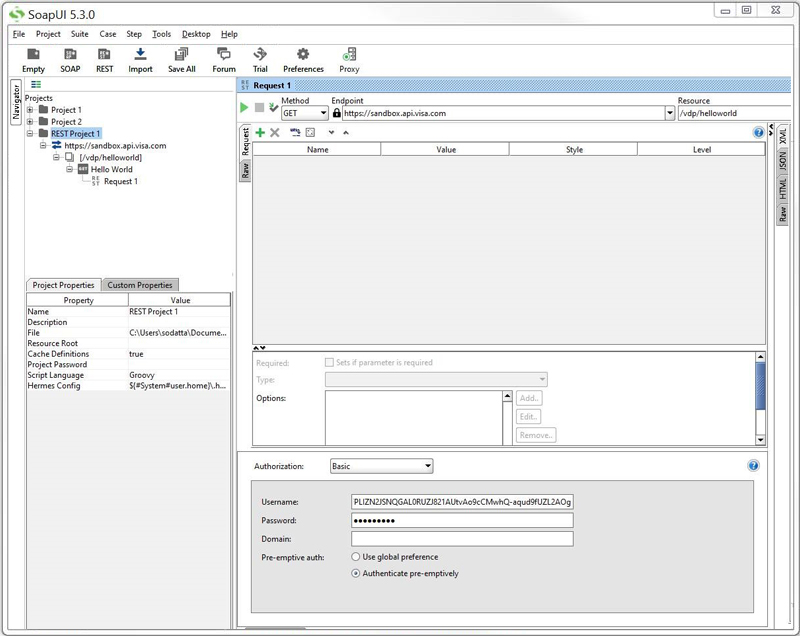
3.
Provide Username and Password availability from VDP for your project. For the Pre-emptive Auth option select Authenticate pre-emptively.
4.
Click Submit Request (green chevron icon below) to test your connection. If successful, you should see the current timestamp in the response panel, as shown below.
Testing Two-Way SSL Connectivity Using Postman
Postman is a free and open source API development and testing solution. With an easy-to-use graphical user interface, Postman allows client developers the ability to rapidly create and execute RESTful API functional tests.
Configuring Postman Two-Way SSL Preferences
In order to configure Two-Way SSL, you need a VDP Project Certificate (cert.pem), basic authentication credentials (user name / password) from your VDP Project Dashboard, an Environment (E.g. Sandbox), a Credentials section and the private key for your project. You can then follow these steps to configure Postman Two-Way SSL preferences.
1.
Download Postman from https://www.getpostman.com/ (Note: the following screenshots taken from version 7.13)
2.
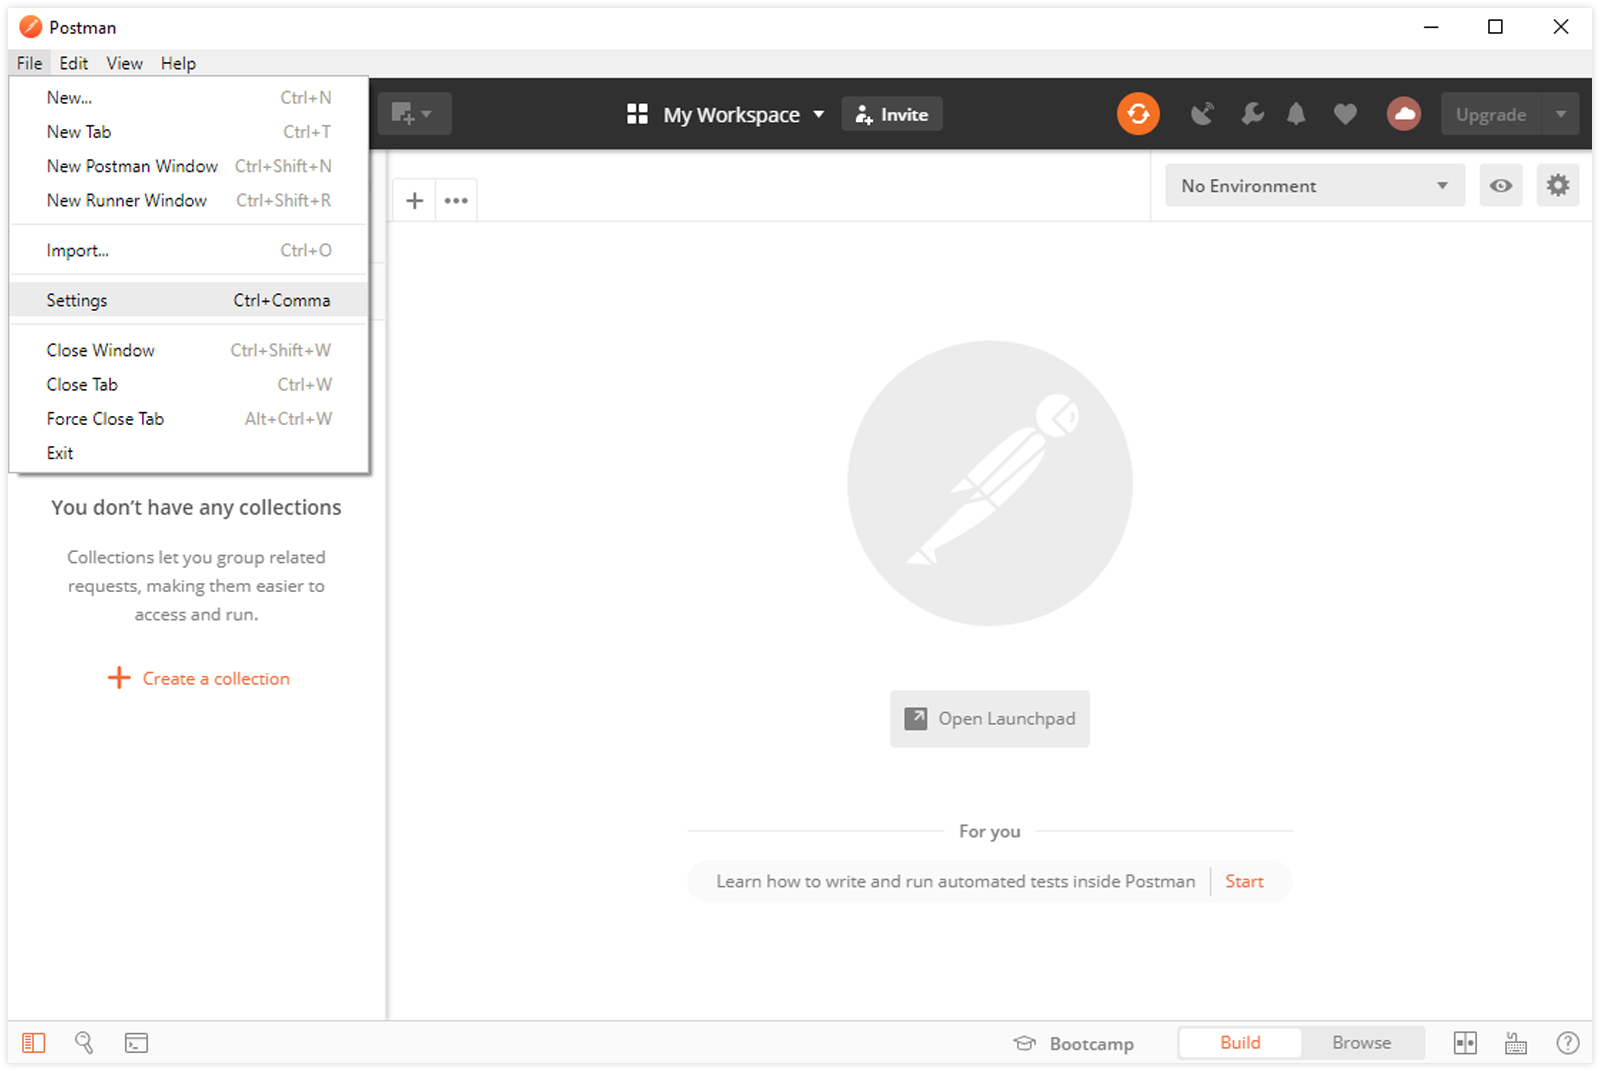
Once installed, open Postman and go to File > Settings as shown:
3.
Select the Certificates tab, click the Add Certificate link, add the Project certificate and private key as shown below and click Add. No Passphrase required.

Creating a Helloworld REST Project
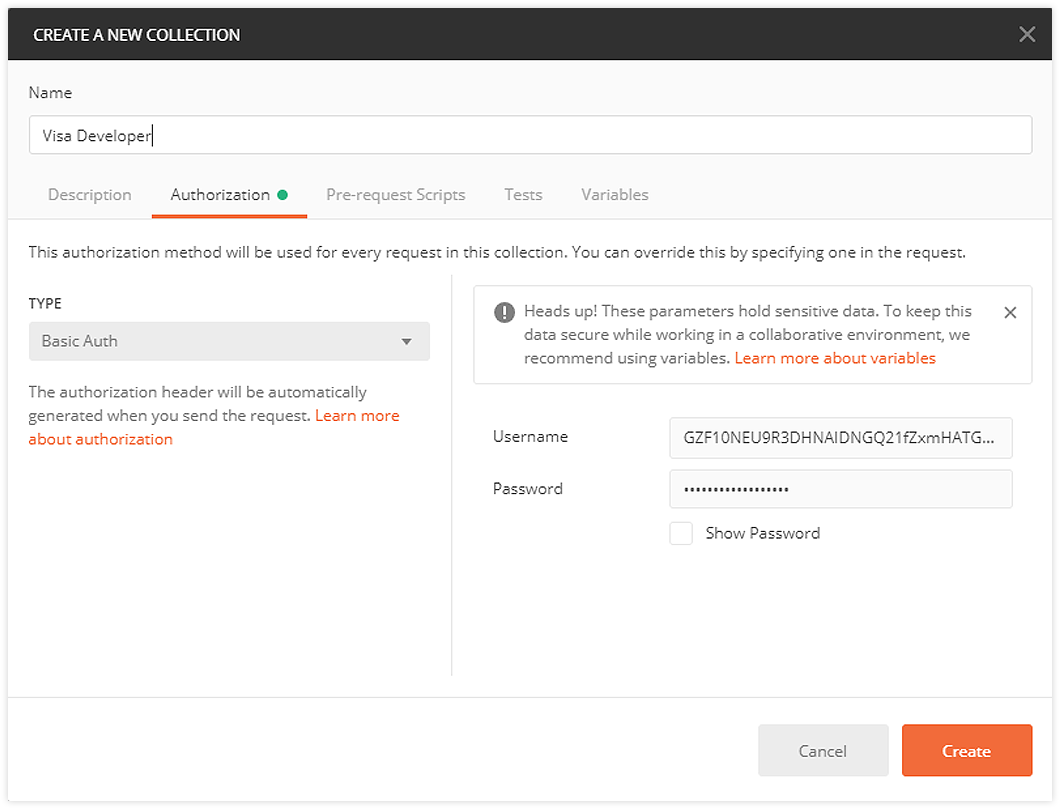
- Once in Postman, click Collections > New Collection.
- Provide a name and select the Authorization tab.
- Provide Username and Password availability from VDP for your project.
- Click Create.
Configuring the Helloworld API Request and Testing the Connection
1.
Expand the newly created collection and click the Add requests link.
2.
Add a request name and open the request by clicking on it.
3.
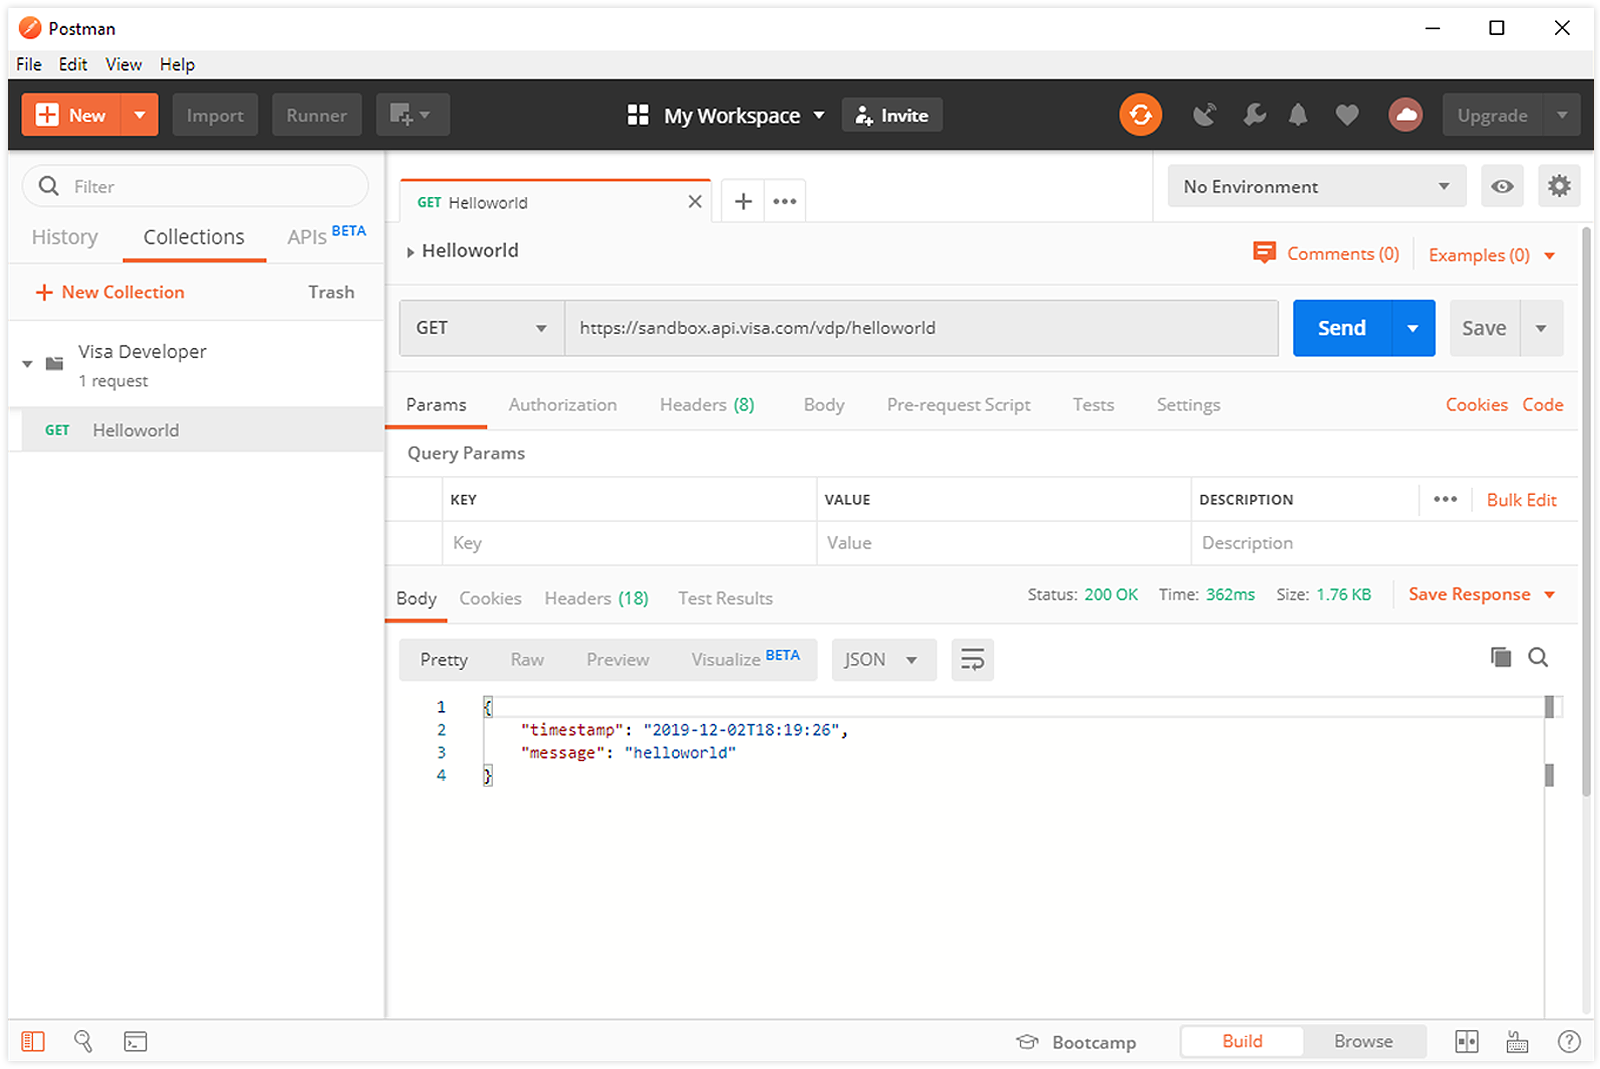
Provide the following helloworld URI in the “Enter request URL” field: https://sandbox.api.visa.com/vdp/helloworld
4.
Click Send to test your connection. If successful, you should see the current timestamp in the response panel, as shown below.
Sample Code for Two-Way SSL
import javax.net.ssl.SSLContext;
import org.apache.http.conn.ssl.SSLConnectionSocketFactory;
import org.apache.http.impl.client.CloseableHttpClient;
import org.apache.http.impl.client.HttpClients;
import org.apache.http.ssl.SSLContexts;

// Load client certificate into key store
SSLContext sslcontext = SSLContexts.custom()
        .loadKeyMaterial(new File(KEY_STORE_PATH), KEY_STORE_PASSWORD.toCharArray(),
                PRIVATE_KEY_PASSWORD.toCharArray())
        .loadTrustMaterial(new File(KEY_STORE_PATH), KEY_STORE_PASSWORD.toCharArray())
        .build();

// Allow TLSv1.2 protocol only
SSLConnectionSocketFactory sslSocketFactory = new SSLConnectionSocketFactory(sslcontext, new String[] { "TLSv1.2" }, null,
        SSLConnectionSocketFactory.getDefaultHostnameVerifier());

CloseableHttpClient httpClient = HttpClients.custom()
            .setSSLSocketFactory(sslSocketFactory).build();
import requests

r = requests.post(url,
                  verify = ('put the CA certificate pem file path here'),
				  cert = ('put the client certificate pem file path here','put the private key pem file path here'),
				  headers = headers,
				  auth = (user_id, password),
				  data = body)
var request = require('request');
var req = request.defaults();
var fs = require('fs');

req.post({
    uri : "https://sandbox.api.visa.com/…",
    key: fs.readFileSync(keyFile),
    cert: fs.readFileSync(certificateFile),
    ca: fs.readFileSync(caFile)
    headers: {
      'Content-Type' : 'application/json',
      'Accept' : 'application/json',
      'Authorization' : 'Basic ' + new Buffer(userId + ':' + password).toString('base64')
    },
    body: data
  }, function(error, response, body) {
    …
  }
);
require 'rest-client'

begin
response = RestClient::Request.execute(
    :method => :post,
    :url => url,
    :headers => headers,
    :payload => $body,
    :user => user_id, :password => password,
    :ssl_client_key => OpenSSL::PKey::RSA.new(File.read(key_path)),
    :ssl_client_cert => OpenSSL::X509::Certificate.new(File.read(cert_path)),
    :ssl_ca_file => ca_cert_path
)
rescue RestClient::ExceptionWithResponse => e
response = e.response
end
using System.Net;
using System.Security.Cryptography.X509Certificates;
HttpWebRequest request = WebRequest.Create (requestURL) as HttpWebRequest;
// Add headers
string authString = userId + ":" + password;
var authStringBytes = System.Text.Encoding.UTF8.GetBytes (authString);
string authHeaderString = Convert.ToBase64String (authStringBytes);
request.Headers ["Authorization"] = "Basic " + authHeaderString;
// Add certificate
var certificate = new X509Certificate2(p12certificatePath, p12certificatePassword);
request.ClientCertificates.Add(certificate);
$authString = $userId.":".$password;$authStringBytes = utf8_encode($authString);
$authloginString = base64_encode($authStringBytes);
$authHeader= "Authorization:Basic ".$authloginString;
$header = (array("Accept: application/json", "Content-Type: application/json", $authHeader));
$ch = curl_init();
curl_setopt($ch, CURLOPT_HTTPHEADER, $header);
curl_setopt($ch, CURLOPT_SSLCERT, $certificatePath);
curl_setopt($ch, CURLOPT_SSLKEY, $privateKey);
curl_setopt($curl, CURLOPT_CAINFO, $caFile);