Visa Accept Service B2B APIs support seller onboarding, transaction processing, and ongoing management through a set of integration stages. Each stage requires specific APIs that must be executed in sequence to ensure correct processing.
Your backend orchestrates these APIs to validate data, manage seller profiles, and process transactions. Seller onboarding and activation must be completed before transaction processing, and most operations depend on identifiers returned from earlier steps.
This table groups APIs by integration stage and maps each stage to its corresponding endpoints.
| Lifecycle Stage | Description | APIs / Endpoints |
|---|---|---|
| Application Configuration | Retrieves application configuration settings including integration mode (API-Only or Hybrid), account closure period, and other app-specific properties. This should be the first API call to understand how your application is configured. | |
| Pre-Eligibility Validation | Validates prerequisites required before creating a seller profile. These checks confirm that the payment instrument is supported and that the seller identifier is available, helping prevent enrollment failures. | |
| Seller Onboarding | Creates the seller profile and establishes the identity used for all subsequent operations. This stage returns the sellerId, which must be stored and reused for transaction processing and lifecycle operations. | |
| Device Registration (Hybrid only) | Registers devices used for payment acceptance in Hybrid integrations. This stage applies only when using SDK-based Tap-to-Phone or card-present scenarios that require device-level configuration. | |
| Payment Initiation | Initiates payment or refund transactions for an active seller. Supports direct transaction processing where your backend submits transaction requests, and hosted payment links where customers complete checkout on a Visa-hosted page. | |
| Transaction Lifecycle Management | Provides access to transaction history and detailed transaction data for reconciliation, reporting, and refund workflows. These APIs allow you to retrieve individual transaction records and related transaction information. | |
| Seller Lifecycle Management | Supports ongoing maintenance of seller profiles after onboarding. These APIs allow you to update seller details, search for existing sellers, manage account closure, and report compliance status (KYB/TnC completion) to Visa Accept. | POST /notification/seller/status |
Complete seller onboarding and confirm an ACTIVE seller status before invoking transaction APIs. Transaction processing requests for inactive or incomplete seller profiles will fail.
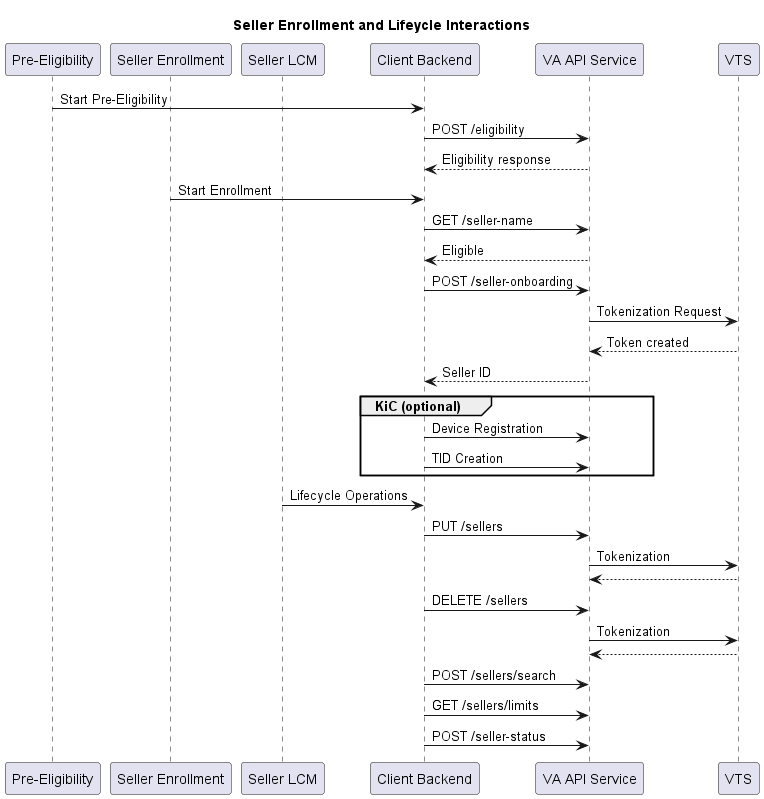
This diagram illustrates the seller onboarding and lifecycle management flow across pre-enrolment, enrollment, and post-onboarding operations
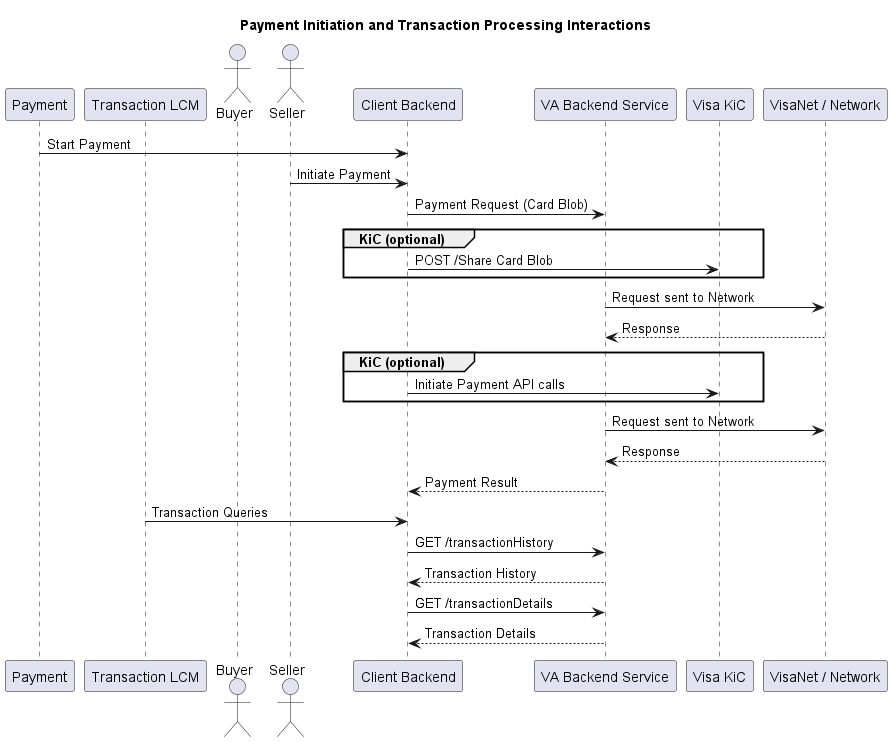
This diagram illustrates payment initiation and transaction processing flows after the seller has been onboarded and activated.
This section describes the end-to-end API usage flow for integrating Visa Accept Service B2B APIs across the full seller lifecycle, from enrollment through transaction processing and ongoing management.
End-to-End API Workflow Mapping
| Workflow Stage | Endpoints |
|---|---|
| Application setup | |
| Eligibility validation | |
| Seller enrollment | |
| Transaction processing | |
| Lifecycle management |
This workflow defines the end-to-end sequence of API calls required to enable seller acceptance capabilities across the full lifecycle.
The primary business workflows include:
The workflow sequence ensures that seller onboarding and activation are completed before transaction processing begins, with transaction processing workflows depending on an active seller profile and refund workflows depending on previously processed transactions.
To enable seller acceptance capabilities, follow this specific sequence of API calls.
Common challenges when integrating with Visa Accept:
During integrations, avoid these common errors:
 Start a Project