To start using B2B Virtual Account Payment Method, the process begins with setting up the companies that will use the virtual accounts, referred to as "Buyers." When onboarding a new Buyer, three crucial steps must be completed before they can utilize virtual accounts:
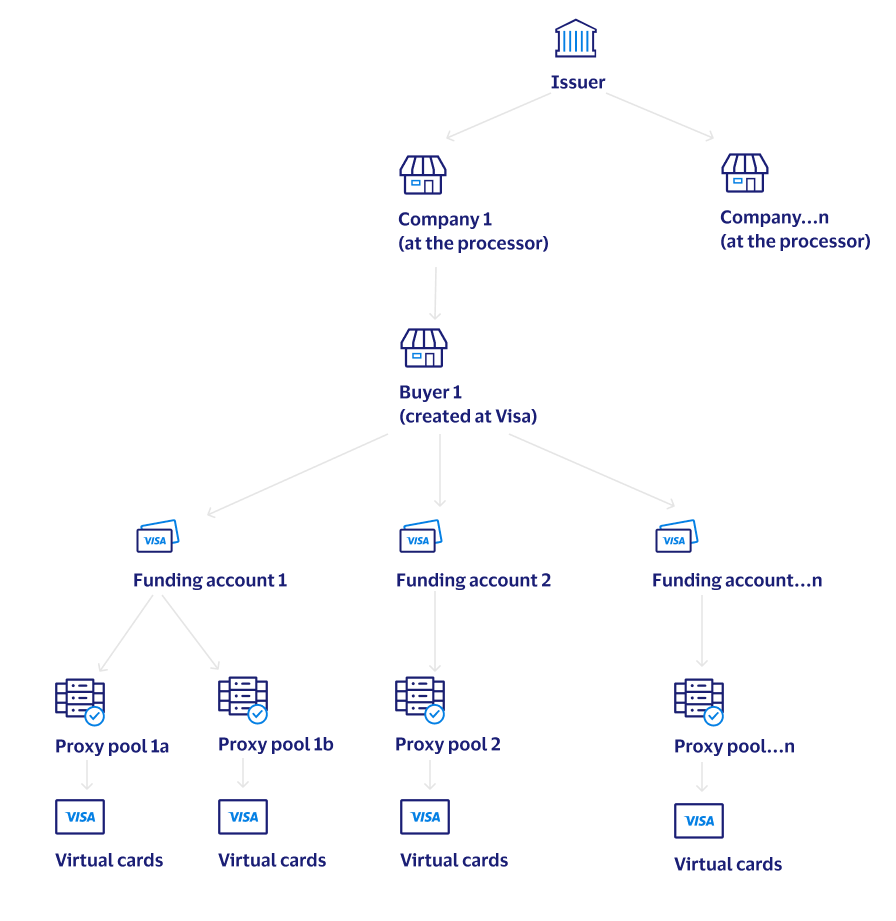
The following diagram illustrates the relationship between a Buyer, Funding Accounts, Proxy Pools, and the underlying Virtual cards:
Buyer Endpoints:
Initiating the onboarding process for a new company begins with the creation of a Buyer using the Create Buyer endpoint. This crucial step lays the foundation for the Buyer by establishing basic company information, payment configurations, and notification preferences.
Creating a Buyer can be accomplished in two ways. The standard approach is to provide a full request payload that includes every data input needed for the Buyer in each request.
However, a more streamlined option is to utilize a Buyer Template. Buyer Templates offer the convenience of predefining values for specific parameters in the 'Create Buyer' request, which can then be used when creating new buyers by simply referencing the Buyer Template ID. By utilizing a Buyer Template, you will only need to supply buyer information that's not already encapsulated in the template (i.e. information that is unique to that buyer). While optional, we recommend using Buyer Templates due to their ability to streamline the buyer creation process and reduce the amount of data that needs to be populated in each request.
Note: The companyId used when creating a Buyer must be the same Company ID at the processor (if applicable for processor integration). The Buyer ID and Buyer Name are displayed to users throughout the VPA UI and can be different from the Processor ID and Processor Name, or can be the same as the Company ID.
As mentioned in the previous section, while the use of Buyer Templates is optional, it is highly recommended.
You can create a Buyer Template by sending a request to the Create Buyer Template endpoint. For a detailed view of the required and optional fields, please refer to the Buyer Template Details table.
Once a Buyer Template has been created, it can be utilized in the creation of Buyers going forward by including the buyer template ID in the 'templateID' request parameter of the 'Create Buyer' endpoint. This approach significantly decreases the number of inputs required, with the only additional request parameters being those related to unique Buyer information not encapsulated within the template.
Note: Once a buyer is created using a specific Buyer Template, the Template ID is permanently associated with the Buyer and cannot be changed or reassigned. This means that you can't add or switch Template IDs after creation. However, you can still adjust the buyer's individual parameter values using the Update Buyer endpoint.
The Update Buyer endpoint allows you to modify details for individual buyers, irrespective of whether their creation was template-based or not. For example, it enables you to adjust a buyer's default expiration period from a template's standard 45 days to a more suitable 30 days.
When carrying out update to a Buyer, simply include the required key identifiers (clientId, buyerId, and messageId), along with the fields that need modifications. Please remember that not all fields are mandatory, and any changes made will be effective immediately.
The Update Buyer Template endpoint allows you to alter the predefined parameter values associated with a specific Template ID.
It's important to note that the endpoint provides the versatility to apply the changes across all existing buyers created with the specific template, as well as any prospective buyers. Alternatively, you can choose to maintain the current configuration for existing buyers and only apply the changes to buyers created moving forward. This is controlled by the syncBuyerProfiles field.
Warning: Setting "syncBuyerProfiles": true facilitates bulk changes to any existing buyers with that templateId, but use it judiciously. Consider potential effects on existing buyers before altering parameters.
When carrying out updates to a Buyer Template, simply include the required key identifiers (clientId, messageId, and templateId), along with the fields that need modifications. Please remember that not all fields are mandatory, and any changes made will be effective immediately.
To prevent potential adverse effects, deleting individual buyers or buyer templates is not permitted through APIs. For assistance with deleting buyers or buyer templates, please reach out to your Visa Implementation representative.
Funding Account Endpoints:
In virtual card implementations that employ Visa Pseudo Accounts or TSYS VANs, it is mandatory to set up at least one Funding Account for each buyer. A Funding Accounts is a 16-digit PAN that serves as a primary parent account, under which multiple secondary Pseudo Accounts or TSYS VANs are derived. It's important to note that Funding Accounts are not required for implementations that use virtual Processor PANs.
Legacy Processor PANs: Processor PANs are a legacy model that's no longer supported for new issuers, but is still maintained for existing issuers that are currently using this model.
Clients utilizing a legacy Processor PAN implementation should proceed directly to "Step 3: Create Proxy Pool". To learn more about the different Virtual Account Types supported on the platform, refer to the Virtual Account Types page.
Warning: Prior to using the Funding Account APIs, the completion of all issuer BIN tokenization and mapping is required. Given that these API requests and responses might contain 16-digit PANs, it is also mandatory for API consumers to maintain PCI Compliance to ensure the secure handling of sensitive cardholder data.
A Funding Account should be a distinct 16-digit PAN, assigned by the issuer to the specific corporate Buyer (Funding Accounts are not designed for shared usage across multiple Buyers). To link a Funding Account to a Buyer, send an API request with a payload that includes the PAN details to the Add Funding Account endpoint.
Warning: Integrated vs Nonintegrated Processors
Visa maintains direct integrations with specific processors, which enables the automation of various procedures. For issuers who have this processor integration enabled, there's no need to provide the credit limit and expiration date for the funding account, as the Virtual Account platform can retrieve this information directly from the processor. However, for issuers lacking this processor integration, all PAN information should be supplied via the API. It's crucial that the information provided matches the data held by the processor to avoid potential complications during transaction authorization.
To update a Funding Account, use the Update Funding Account endpoint.
For issuers with an integrated processor, the API allows the modification of only one funding account detail - the 'defaultAccount' flag. This flag enables you to set the funding account as the Buyer's preferred choice. Any other updates to the funding account must be executed directly with the processor. Rest assured, Visa's virtual account platform will automatically synchronize with the new details once the changes have been implemented at the processor.
For issuers with a nonintegrated processor, the defaultAccount, creditLimit, and expirationDate can be updated via API, but the changes should also be made directly at the processor to ensure that the systems remain in sync.
Note: If updates are made to the creditLimit or expirationDate, the new values will only apply to virtual accounts that are requested going forward. Virtual accounts that are already in use will retain the original values.
To delete a funding account from a Buyer, use the Update Funding Account endpoint and set the "action" parameter to "D" for delete.
Note: Before submitting a request to delete a funding account, ensure that all active payment instructions and account requisitions linked to the funding account are canceled, and all associated proxy pools are deleted. Failure to do so will result in the request being unsuccessful.
The Get Funding Account Details endpoint allows you to retrieve the current status of a funding account. It provides information such as the credit limit, expiration date, and the count of active virtual accounts linked to the funding account. As a funding account can serve multiple proxy pools, this API conveniently offers the aggregate number of active accounts across all pools. Please note, 'active accounts' refer to all accounts requisitioned under a funding account, excluding any deleted accounts.
Warning:
Proxy Pool Endpoints:
A Proxy Pool represents a collection of ready to use virtual accounts. When a payment to a Supplier is initiated or a virtual card is requested on demand, the virtual account engine will randomly pull a virtual card from the selected Proxy Pool in order to carry out the operation.
You can create proxy pools by using the Create Proxy Pool endpoint.
In implementations utilizing Visa Pseudo Accounts or TSYS VANs, it's imperative to connect a Funding Account to the proxy pool using the 'fundingAccountNumber' request parameter. This is pivotal as all transactions processed through these virtual accounts will ultimately seek authorization against the overarching parent Funding Account.
Warning: Because the Funding Account information isn't masked within the API, the API consumer must be PCI Compliant to use this API.
When you create a Proxy Pool, you'll specify the number of virtual accounts to initially load into the pool (initialOrderCount), the minimum number of accounts that should be available within the Proxy Pool at any given moment (minAvailableAccounts), and the number of additional virtual accounts that should be automatically ordered from the token vault in the event that the Proxy Pool drops below that minimum threshold (reOrderCount). These settings guarantee the immediate availability of virtual accounts in your Proxy Pool whenever you require one.
Note: The initial order of virtual accounts for a proxy pool will be requested from the token vault and populated into the Proxy Pool within 15 minutes of creation.
Note: For proxy pools associated with buyers that are enabled for pseudo accounts, the pool is automatically replenished. Therefore, the 'Manage Proxy Pool' and 'SUA Get Account Status' endpoints are not applicable for these buyers. These endpoints are only relevant to legacy implementations using Processor PANs.
Note: Processor PANs are a legacy model that's no longer supported for new issuers, but is still maintained for existing issuers that are currently using this model.
For clients operating with a legacy implementation that utilizes Processor PANs, you'll need to create a Proxy Pool without a Funding Account via the Create Proxy Pool endpoint. Subsequently, the issuer is required to populate the newly created Proxy Pool with the initial order of virtual accounts, which can be accomplished by using one of the following methods:
Note: For issuers with an integrated processor, all future account reorders are automated. The virtual account engine will go directly to the processor to requisition the specified account quantity when the proxy pool reaches the 'minAvailableAccounts' threshold. This will trigger an automatic reorder from the processor based on the 'reOrderCount' to replenish the pool. For detailed information on supported Virtual Account Types, please refer to Virtual Account Types page.
Note: Processor PANs are a legacy model that's no longer supported for new issuers, but is still maintained for existing issuers that are currently using this model.
If the issuer used the Manage Proxy Pool endpoint to load the initial order of accounts into the proxy pool, the SUA Get Account Status endpoint can be used to check the status of that request. You need to pass the proxy pool number and the unique Account Request ID which was returned to you as part of the response payload to the Manage Proxy request (requesting multiple accounts). The system sends the details of the accounts that were successfully created as part of the response to this API. For the details of the request and response for this API, refer to API Reference.
You can update a proxy pool by using the Update Proxy Pool endpoint.
After a proxy pool is created, only the following settings can be updated:
Note: If the Proxy Pool has not yet been populated with the initial load of virtual accounts, it may also be possible to update 'initialOrderCount', 'creditLimit', 'authControlEnabled' flag, and 'proxyAccountType'.
You can delete a proxy pool by using the Delete Proxy Pool endpoint provided that the following two conditions are met:
You can view the settings and number of accounts in a Proxy Pool by using the Get Proxy Pool endpoint. The virtual accounts within the pool are categorized by the following statuses
Warning: For Visa Pseudo Accounts and TSYS VANs, the full, 16-digit funding account is passed in the response. Because the funding account information is not masked within the API, the API consumer must be PCI Compliant to use this API.
Buyers wishing to submit payment instructions to pay invoices from their Suppliers using a virtual card must create a unique profile for each Supplier to receive payment. The Supplier Service includes APIs that facilitates the management of Suppliers for each Buyer.
Note: Creating Suppliers is required only for clients using the Payments Service to generate virtual accounts for settling invoices and bills (see section "Processing Supplier Payments"). Clients requesting Virtual Accounts with authorization controls for ad-hoc usage do not need to create Suppliers (see section "Requesting Virtual Accounts").
Supplier Endpoints:
The Create Supplier endpoint is used to create Suppliers who will be the recipients of payments from Buyers.
Single Use Accounts vs. Lodged Accounts
By default, every payment submission from a Buyer to a Supplier creates a unique virtual account for each distinct payment, a feature we refer to as a single use account.
However, we also offer an alternative to single use accounts where you can associate a specific account with a Supplier. In this setup, all payments to that Supplier use the same virtual account, a feature known as a lodged account. To set up a lodged account with a Supplier, simply enter the lodged account details into the optional 'cardDetails' object, during the Supplier creation process. This ensures a consistent payment method for all transactions with that Supplier.
Supplier Initiated Payments vs. Buyer Initiated Payments (aka Straight Through Processing)
Suppliers have two methods available for receiving payments:
In the case of the Supplier Initiated Payment (SIP) method, the Supplier receives an email notification containing detailed instructions on how to access the virtual account information. The Supplier would then input these details into their point-of-sale system. Supplier Initiated Payments serve as the default method of payment delivery.
Note: If you wish to own supplier communications directly, instead of through Visa, you can activate the 'suppressSupplierNotification' flag on the Buyer. This action ensures that payments made to suppliers linked with this Buyer will not trigger any notifications to those suppliers, thereby giving you more control over the communication process.
In the Buyer Initiated Payment (BIP) method, the payment is directly transferred to the supplier's account, eliminating the need for any manual input from the supplier into their point-of-sale sytem. This method is often referred to as Straight Through Processing (STP). To set up Buyer Initiated Payments, the Supplier must first register onto the CyberSource platform. Once registered, the STP ID is linked to the supplier during the supplier creation process using the 'stpId' parameter.
Note: Both the Issuer and the Acquirer must be enabled for straight through processing to send Buyer Initiated Payments.
The Update Supplier endpoint allows you to modify details for a Supplier that has been created.
You can use the ManageSupplierAccount endpoint for managing accounts associated with a supplier. Using this endpoint, you will be able to add a new account to a supplier. If your bank is associated with one of the processors the B2B Virtual Account Payment Method system is integrated with, you will be able to request for a new account from the processor. You can also create the account at the processor and send it in the request to be associated with the supplier. This endpoint also supports the update of account attributes and closing/deleting an account. If an account is closed, the system does the following:
Note: For buyers enabled for pseudo accounts, the system allows only "Request New Card" or "Remove Account" actions.
For the details of the request and response for this endpoint, refer to API Reference.
You can use the Disable Supplier endpoint for deleting a supplier from the system. The system does the following for the supplier being deleted:
For the details of the request and response for this endpoint, refer to API Reference.
You can use the GetSupplierDetails endpoint for getting the details of a supplier already setup in the B2B virtual account payment method system. The details includes the supplier details and the details of all the accounts associated with the supplier.
For the details of the request and response for this endpoint, refer to API Reference.
Clients can leverage Visa's accounts payable capabilities through the endpoints provided by the Payments Service. Buyers receiving invoices or bills from their Suppliers can use this service to automate their entire accounts payable process.
The Payments Service manages the entire payables process, from generating virtual cards from payment instructions to delivering the payment to Suppliers, and subsequently updating the payment status for reconciliation.
Payments Endpoints:
You can process the following types of payments:
Conventional Payment Flow
The B2B Virtual Account Payment Method system does the following for the payment instructions (Conventional Payments):
Scenario 1: New Supplier: You are trying to pay a new supplier and passing the payment for the first time.
| ACCOUNT PICKING LOGIC | ||
|---|---|---|
| PAYMENT CURRENCY | SUPPLIER IS VPC ENABLED | POOL SELECTED |
| Same as buyer Currency | Yes |
Adjustable limit pool with Visa Payment Controls (VPC) enabled. If no accounts are available or no adjustable limit pools with VPC enabled are available, choose a card account from a SUA pool which is enabled for VPC. If no accounts in the SUA pool or no SUA pools with VPC enabled are available, reject the payment. |
| Same as buyer Currency | No | Adjustable limit pool not enabled for VPC. If no accounts are available or no adjustable limit pools not enabled for VPC are available, choose a card account from a SUA pool which is not enabled for VPC. If no accounts in the SUA pool or no SUA pools that are enabled for VPC are available, reject the payment. |
| Different from buyer currency |
Yes | SUA pool enabled for VPC. If no accounts in the SUA pool or no SUA pools with VPC enabled are available, reject the payment. |
| Different from buyer currency |
No | SUA pool not enabled for VPC. If no accounts in the SUA pool or no SUA pools that are enabled for VPC are available, reject the payment. |
Note: For proxy pools associated with buyers enabled for the pseudo account feature, if there are no available accounts in the proxy pool picked, the system will generate a new pseudo account (from VisaNet) and use that for the payment. If it is a regular account proxy pool, the request will be rejected f there are no accounts.
Scenario 2: Existing Supplier: You are trying to pay an existing supplier
Note: In both of the above scenarios, if security code is not required for the supplier, the secure URL for getting the account details (full 16 digit card account number, cvv2 and expiration date) will not be sent in the payment advice notification.
Scenario 3: A BIP (STP) supplier.
Note: In all the above scenarios, if the system does not find a lodged account or there are no available account in the proxy chosen, the system will reject the payment request. For pseudo account, the logic is the same except that if there are no available accounts in the proxy pool, the system generates a new pseudo account, places it in the proxy pool picked and uses the newly generated account to complete the processing of the payment. If you want the system to generate a pseudo account and lodge it to the supplier, send the last 6 digits or the full 16 digits of the funding account in the account number field. The system uses the funding account passed to request for a new pseudo account and lodges it to the supplier. You can also optionally request for a new pseudo account for an existing supplier by passing the funding account number.
Scenario 4: Paying a supplier by passing the proxy pool number in the account number field.
You can also pass the proxy pool, which you would like to use for making a payment. The system will:
Note: In all the above scenarios, if the processor is down for nightly processing, the system will queue the payment and complete the processing after the down time.
For the details of the request and response for this endpoint, refer to API Reference.
Processing Payment requisition
You can request an account from a SUA proxy pool, for processing the payment yourself. The system does the following when you perform payment requisition:
Resending a Payment
You can resend the payment instruction which you sent to a supplier using the Resend Payment endpoint. You can use this endpoint if the supplier has lost the original payment request. You can optionally increase the payment expiry date of the original payment using this endpoint if it is nearing the payment expiry date. For the details of the request and response for this endpoint, refer to API Reference.
Getting the Payment Detail URL
You can use the getPaymentDetailURL endpoint to get the secure URL which is sent in the payment advice notification. This URL is used for authenticating the supplier before showing the full payment information (including the 16-digit account, expiry date and CVV2 details). For the details of the request and response for this endpoint, refer to API Reference.
Note: This URL is generated only if the supplier notification is not suppressed in the buyer profile.
Get Payment Controls
You can view the current state of the authorization controls on an account using the getPaymentControls endpoint. This endpoint will provide the list of all the authorization controls currently active on a virtual account (Processor PANs, Pseudo Accounts, and TSYS VANs). Additionally, it allows clients to get the accumulated balance ($ amount and # of authorizations) on the account so far, as well as the remaining amount ($ amount and # of authorizations) on a Spend Velocity Rule for an account. For details about the fields in the request and response, refer to API Reference. For more information about the control details provided in the response, refer to the B2B Virtual Account Payment Method Codes page. On this Codes page, there are two tables you need to refer to. First, navigate to the Rules and Overides section for your use case and account type to view the override codes for all rules. Second, the Get Payment Controls section will provide additional fields/overrides that are included in to the Get Payment Controls API (for your account type) on top of the override codes in the first table.
Get Payment Details
You can use the getPaymentDetails endpoint to retrieve the details of all the payments made in the last 90 days. System optionally allows you to search for payments made within a date range, payments with a particular status, and a single payment by providing the tracking number (message id of the original process payment request). For the details of the request and response for this endpoint, refer to API Reference.
The system retrieves the details of the first 250 payments qualifying the search criteria you submitted in the request.. The response will indicate if there are more payment details to be retrieved. If there are more, you can submit the request again for the next set of 250 payments. You can do this until you have retrieved all the payment details.
Canceling a Payment
You can cancel a payment which is not yet been collected by the supplier (in the unmatched status) using the cancelPayment endpoint. You need to pass the message id of the original payment request to cancel a payment. The system does the following when you cancel a payment:
For the details of the request and response for this endpoint, refer to API Reference.
You can use the Account Management Services APIs for setting authorization Controls, request for virtual account with authorization controls set for assigning it to an employee (VVAM program), to get the status of a new account requested from the processor and to get the security code or CVV2 of an account.
Request Virtual Account
You can use the Request Virtual Account endpoint to request one or more virtual accounts or pseudo accounts from a proxy pool and set requisition parameters. You may also add customized authorization controls on the card(s) you are requesting. You are required to set a minimum of one spending rule for account protection ( for example, the Spend Velocity Rule). For details on the authorization controls supported in this endpoint, refer to API Reference. You can also update the requisition parameters ( including requisition expiration date and authorization controls) using this endpoint. For details on the request and response for this endpoint, refer to API Reference. Refer to the Get Payment Controls response section on the codes page at Request Virtual Account and Manage Payment Controls Rules and Overrides for more details.
Note: If you set the requisition start date as a future date, the account will be returned in the response and a $0.01 rule will be placed on the account for protection. Once the future payment date is reached, the authorization control will be set on the account. This is based the requisition start date and requires the time zone value to be specified.
You can request more than one account using this endpoint. All requisitions will have the same account parameters, i.e. start date, end date, authorization controls. If this option is used, a file will be generated with the card information. ( See Request Virtual Account: Endpoint File for Multiple Accounts.) This connection can be configured through the Visa Implementation Manager.
A reconciliation file will be available, daily, weekly, or monthly containing settlement data received from payment requisitions generated through this endpoint. Please work with your Visa Implementation Manager to arrange the delivery configuration. This file will contain settlements that have come through and will be matched with their requisition information. This settlement file includes the ability to pass up to 50 optional fields through the initial request. This information will be delivered in the Request Virtual Account Reconciliation Extract File. Based on your delivery configurations, you will receive an empty file with headers if there are no settlements for the time period.
Note: For proxy pools associated with buyers enabled for the pseudo account feature, if there are no available accounts in the proxy pool picked, the system will generate a new pseudo account (from VisaNet) and use that for the payment. If it is a regular account proxy pool, the request will be rejected if there are no available accounts.
Getting the Security Code (CVV2) of an account
You can get the security code (CVV2) of an account using the getSecurityCode endpoint. You need to pass the full 16 digit of the account number and the expiry date of the account and the system will retrieve the security code and send it in the response. This endpoint can be used for retrieving the security code for both regular virtual accounts (processor based) and pseudo accounts (generated by Visa). For the details of the request and response for this endpoint, refer to API Reference.
Manage Payment Controls [LEGACY]
You can manage the authorization controls set on an account using the managePaymentControl endpoint. This endpoint allows you to manage the authorization controls on any account (virtual or plastic). It allows you to add/remove or update the authorization controls and their effective date set on an account. For details of the authorization, controls supported by this endpoint and for the details of the fields in the request and response, refer to API Reference.
Note: The Manage Payment Controls end point supports all authorization rules including Tolerance, Spend Velocity, and Card Acceptor ID.
Get Payment Controls
You can view the current state of the authorization controls on an account using the getPaymentControls endpoint. This endpoint will provide the list of all the authorization controls currently active on a virtual account (Processor PANs, Pseudo Accounts, and TSYS VANs). Additionally, it allows clients to get the accumulated balance ($ amount and # of authorizations) on the account so far, as well as the remaining amount ($ amount and # of authorizations) on a Spend Velocity Rule for an account. For details about the fields in the request and response, refer to API Reference. For more information about the control details provided in the response for each account type, refer to codes page for Request Virtual Account and Manage Payment Controls Rules and Overrides.
Get Account Request Status [LEGACY]
You can get the status of an account you have requested from the processor using the getAccountRequestStatus endpoint. You need to pass the unique account request id (which the system returned as the response for your account request). It takes 24 hours for the account to be active at the processor. If you send the request after 24 hours of requesting, the system will return the account number (of the newly created account) and its expiry date in the response. For the details of the request and response for this endpoint, refer to API Reference.
Getting the status of the Exact Match control(s) on an account
You can get the details of all the exact match rules set on an account using the listPaymentControls endpoint. For the details of the request and response for this endpoint, refer to API Reference.
Note: If you have not coded to this API, please use the Get Payment Controls API to get details about all rules on an account.
This is the file specification and layout for the Request Virtual Account Reconciliation Extract File. All settlements that come through originating from the Request Virtual Account API will be matched with the payment requisition information, including the requisition status. The user has the ability to include up to 50 optional fields in the original requisition request, and it will be passed through to the reconciliation file. The file is available daily, weekly, or monthly and can be configured through the Visa Implementation team. Based on your delivery configurations, you will receive an empty file with headers if there are no settlements for the time period.
Note: There are three available statuses for the requisition: Active, Complete, and Delete.
Active "A" - This indicates if a settlement is attributed to an open requisition. The settlement is received within the requisition validity dates.
Complete "C" - This indicates if the settlement was received after the requisition validity end date.
Delete "D" - Deleted - The settlement was received for a deleted requisition.
Request Virtual Account Reconciliation Extract File Format Specification
| FIELD NAME | FIELD SPECIFICATION(TYPE) | FILE SPECIFICATION (LENGTH/FORMAT) |
FIELD DESCRIPTION | DATA SOURCE |
|---|---|---|---|---|
| Bank ID | Alphanumeric | 15 | The bank ID is the bank identifier as defined in Visa Payables Automation. | Derived from the client ID sent in the web service request |
| Buyer ID | Alphanumeric | 25 | The buyer ID is the buyer identifier as defined in Visa Payables Automation. | Derived from the buyer ID sent in the web service request |
| Account Number | Numeric | 16 | The account number identifies the account for the defined requisition parameters.
If the masking feature is enabled, the account number will be masked per the specifications in the Buyer Profile. |
The account picked from the proxy pool requested in the web service request |
| Proxy Pool ID | Alphanumeric | 19 | Unique identifier of the single use proxy pool | Web service request |
| Requisition Start Date | Date | Buyer Date format | Account validity start date. This is based on the date format set up in the Buyer Profile. |
Web service request |
| Requisition End Date | Date | Buyer Date format | Account validity end date. This is based on the date format set up in the Buyer Profile. |
Web service request |
| Time Zone | Alphanumeric | 12 | The timezone used in the payment instruction. This will be in the format of UTC-6, UTC+8, etc. Note: For VPP/buyers using VANs, the timezone should reflect EST. |
Web service request |
| Billing Amount | Decimal | 18, 2 | The billing amount of the transaction. This will be transaction amount converted to the billing currency. | BASE II Settlement |
| Billing Currency Code | Alphabetic | 3 | The billing currency of the transaction. ISO-alpha currency code. | BASE II Settlement |
| Transaction Amount | Decimal | 18, 2 | BASE II value for posted and settled transaction; Value reflects decimal point followed by two values; dash or “-" sign indicates negative value. | BASE II Settlement |
| Transaction Currency Code | Alphabetic | 3 | This is the currency code in which the transaction occurred. | BASE II Settlement |
| Merchant Category Code | Alphanumeric | 4 | This is the merchant category code associated with the transaction. | BASE II Settlement |
| Merchant Name | Alphanumeric | 50 | This is the merchant name where transaction was processed. | BASE II Settlement |
| Merchant City | Alphanumeric | 50 | This is the city that corresponds to the merchant name/location where the transaction was processed. Note: This field may contain the merchant's phone number. |
BASE II Settlement |
| Merchant Country Code | Alphanumeric | 50 | This is the country code that corresponds to the merchant name/location where the transaction was processed.. | BASE II Settlement |
| Purchase ID | Alphanumeric | 75 | The purchase ID passed in the posted and settled transaction. (May not be present in all cases.) Only include the purchase ID if the merchant provides it. |
BASE II Settlement |
| Settlement Date | Date | Buyer Date format | BASE II value for posted and settled transactions. This is based on the date format set up in the Buyer Profile. |
BASE II Settlement |
| Credit Debit Indicator | Alphabetic | 1 | This indicates whether the transaction is C - Credit or D - Debit. | BASE II Settlement |
| Transaction Reference Number | Alphanumeric | 24 | Transaction reference number passed for the posted and settled transaction. | BASE II Settlement |
| Requisition Status | Alphabetic | 1 | This is the status of the requisition.There are 3 possible values. Valid values are:
|
VPA System |
| Optional Field Name 1 | Alphanumeric | 50 | Optional Field Name 1 sent in the web service request. | Web service request |
| Optional Field Value 1 | Alphanumeric | 100 | Optional Field Value 1 sent in the web service request. | Web service request |
| Optional Field Name 50 | Alphanumeric | 50 | You can enter up to 50 optional field names. These cannot exceed 50 characters. | Web service request |
| Optional Field Value 50 | Alphanumeric | 100 | You can enter up to 50 optional field values. These cannot exceed 100 characters. | Web service request |
The Request Virtual Account API allows you to request more than one account with the same card parameters within one request. When you request multiple accounts, your account information is sent through a file instead of through an immediate response. The following table lists the specification for the Request Virtual Account: Endpoint File for Multiple Accounts.
Note: If you are requesting pseudo accounts, the PAN will not be passed in the file, only the pseudo account number will be provided.
FILE HEADER FIELD |
FIELD SPECIFICATION (TYPE) | FIELD SPECIFICATION (LENGTH /FORMAT) | FIELD DESCRIPTION |
|---|---|---|---|
| Client ID | Alphanumeric | 16 | This is the client identifier. |
| Bank ID | Alphanumeric | 15 | The bank identifier as defined in Visa Payable Automation. |
| Buyer ID | Alphanumeric | 25 | The buyer identifier as defined in Visa Payable Automation. |
| Client Message ID | Alphanumeric | 8 | This is the client message identifier for the account. |
| Account | Numeric | 16 | This is the full 16-digit account number. |
| Account Expiry Date | Date | Year/Month | Account expiry month and year. |
| Currency Code | Alpha | 3 | The currency code set up for the account. This is the billing currency. |
| Requested Date | Date | Buyer Date Format | This is the date the Request Virtual Account request was made. |
| Validity Start Date | Date | Buyer Date Format | This is the date from which the account will be valid. |
| Validity End Date | Date | Buyer Date Format | This is the date after which the account will no longer be valid. |
Visa Pseudo Accounts (referred to as VIP Pseudo Accounts) offer stronger account protection than using traditional processor based accounts. Issuers and their buyers can use pseudo accounts from the Visa Token Vault rather than the primary account number (PAN) to process a payment. In this model the issuer funding account (PAN) is mapped to a Visa token range for future payment use. With Visa Pseudo Accounts (VIP Pseudo Accounts), you can implement a recycled Single Use Account (SUA) model with extended hold periods prior to reuse, or you can lodge a Pseudo Account with a supplier.
Note: The processor must be certified for commercial tokenization before an issuer or third party can implement the Pseudo Account program.
For Visa Pseudo Accounts:
Note: Previously, the Pseudo Account expiration date was equal to the funding account expiration date plus 3 years. This change is implemented to ensure that other Visa services support pseudo accounts. Payments inflight at the time of the change are not affected.
| API NAME | AVAILABLE WITH PSEUDO ACCOUNTS? | DIFFERENCES WITH PSEUDO ACCOUNTS |
|---|---|---|
| ACCOUNT MANAGEMENT APIs | ||
Virtual Card Requisition |
No |
This API is not supported for Pseudo Accounts. |
Manage Payment Controls |
Yes |
None. This API is used to manage auth controls.
|
List Payment Control |
Yes |
None. This API will only show the Exact Match Rule on the account. |
Get Account Status |
No |
This API is not needed for Pseudo Accounts because Pseudo Accounts are returned soon after they are requested. |
| Get Payment Controls | Yes | The overrides for Visa Processor PANs and Pseudo Accounts are slightly different from the overrides for TSYS VPP VANs. See the Get Payment Controls Response section of the Rules and Overrides Page |
Get Security Code (CVV2) |
Yes |
None. |
Request Virtual Account |
Yes |
None. A spending rule is required for Pseudo Accounts. If there are no available accounts in the proxy pool, the system automatically orders a new Pseudo Account(s) and will return it in the response. |
| Add Funding Account | Yes | With processor integration enabled, the credit limit and expiration date are not required because VPA retrieves that information directly from the processor. If processor integration is not enabled, all key information is required in the API, but that information must match the information at the processor or there might be issues during transaction authorization. Only applicable to Visa Pseudo Accounts and TSYS VANs. (Funding Accounts do not apply to Processor PANs) |
| Update Funding Account | Yes | For buyers with processor interaction enabled, only the default flag can be edited. Other edits must be made directly at the processor and VPA pulls the latest information from the processor. For buyers without processor interaction, the default flag, credit limit, and expiration date can be updated using the Update Funding Account API. This will apply changes to the account in VPA, but changes must also be made at the processor to ensure both systems are in sync. Only applicable to Visa Pseudo Accounts and TSYS VANs. (Funding Accounts do not apply to Processor PANs) |
| Get Funding Account Details | Yes | If processor integration is enabled, this can be used to retrieve the available limit and current balance on the funding account from the processor. Only applicable to Visa Pseudo Accounts and TSYS VANs. (Funding Accounts do not apply to Processor PANs). |
| SINGLE USE ACCOUNT POOL MAINTENANCE APIs | ||
| Create Proxy Pool | Yes | Pseudo Accounts will automatically begin loading into the pool within 15 minutes of the proxy pool being created. Must provide the full 16 digit funding account number. Because the funding account information is not masked within the API, the API consumer must be PCI Compliant to use this API. |
| Delete Proxy Pool | Yes | Note that proxy pools cannot be deleted if accounts have been added. Due to the fact that account are ordered within 15 minutes of the pool being created, there is a small window of time when ths is possible. |
| Get Proxy Pool | Yes | Must provide the full 16 digit funding account number. Because the funding account information is not masked within the API, the API consumer must be PCI Compliant to use this API. |
| Update Proxy Pool | Yes | If accounts have already been loaded into the pool, the account parameters cannot be changed, only proxy features such as reorder count and minimum available accounts. |
Manage Proxy |
Yes |
The Manage Proxy API supports the Close Account action code for VIP-enabled Pseudo Accounts. Note: Pseudo Accounts will automatically request new tokens. This API should not be used to request accounts. |
SUA Get Account Status |
No |
This API is not needed for pseudo accounts because they automatically request new tokens. |
| PAYMENT APIs | ||
Process Payment |
Yes |
The Process Payment API has these differences for Pseudo Accounts:
|
Resend Payment |
Yes |
The system automatically sets the end date for the spend velocity rule using the end date (payment expiration date) passed in the Resend Payment request. |
Get Payment Detail URL |
Yes |
None. |
Get Payment Details |
Yes |
None. |
Cancel Payment |
Yes |
None. |
| SUPPLIER APIs | ||
| Create Supplier | Yes | The issuer must be enabled for VIP pseudo accounts. You can create a supplier and lodge a Pseudo Account using the actionType field: 1 to request a lodged Pseudo Account. VPC is required for payments made with Pseudo Accounts. It is recommended to keep the paymentControlRequired field blank. The system will automatically set the controls on the back end. If a value is entered in this field, it must be set to Y for the request to process successfully. |
Update Supplier |
Yes |
Auth Controls must be enabled because they are required for Pseudo Accounts. |
Disable Supplier |
Yes |
If a supplier is disabled, the system will cancel the outstanding payments for the supplier. It will also close all pseudo accounts lodged to the disabled supplier. |
Get Supplier Details |
Yes |
None. |
Manage Supplier Account |
Yes |
VPC must be enabled. Use the actionType field to request a new lodged Pseudo Account or remove an existing Pseudo Account:
|
| BUYER MANAGEMENT APIs | ||
| Create Buyer | Yes | See Buyer Setup Details page for indepth information about what is required, e.g. authControlsEnabled field must be true as Payment Controls are requried for Pseudo Accounts. |
| Update Buyer | Yes | See Buyer Setup Details page for indepth information about what is allowed to be updated, e.g. authControlsEnabled field must be true as Payment Controls are requried for Pseudo Accounts.. |
| Get Buyer Details | Yes | None. |
| Create Template | Yes | See Buyer Setup Details page for indepth information about what is required, e.g. authControlsEnabled field must be true as Payment Controls are requried for Pseudo Accounts. |
| Update Template | Yes | See Buyer Setup Details page for indepth information about what is allowed to be updated, e.g. authControlsEnabled field must be true as Payment Controls are requried for Pseudo Accounts.. |
| Get Template | Yes | None. |
For an exhaustive list of error codes pertaining to the APIs on this page, see the B2B Virtual Account Payment Method Error Codes page. The codes are organized by API
 Start a Project