Two-Way SSL
Discover how Two‑Way SSL works and how to implement it for secure connections to Visa Developer APIs.

Overview
Two‑Way SSL (mutual TLS) authenticates API requests between your system and Visa Developer APIs using X.509 certificates. With Two-Way SSL, you authenticate Visa Developer using its server certificate. Visa Developer authenticates you using a client certificate issued for your project.
Visa Developer uses Two‑Way SSL for:
- Inbound API calls from your system to Visa Developer APIs
- Outbound callbacks from Visa Developer to your system
This guide explains how to:
- Set up Two-Way SSL for your Visa Developer project
- Generate or upload a Certificate Signing Request (CSR)
- Download and install Visa Developer‑issued client certificates and trusted Certificate Authority (CA) certificates
- Configure keystores and truststores, and verify successful connectivity
Before you begin
Before configuring Two-Way SSL, confirm that:
- You have a Visa Developer account and a project, as described in the quick start
- You can generate a CSR using OpenSSL or Java keytool
- Your outbound callback endpoint is publicly reachable over HTTPS, if using outbound callbacks
Step 1: Prepare inbound credentials
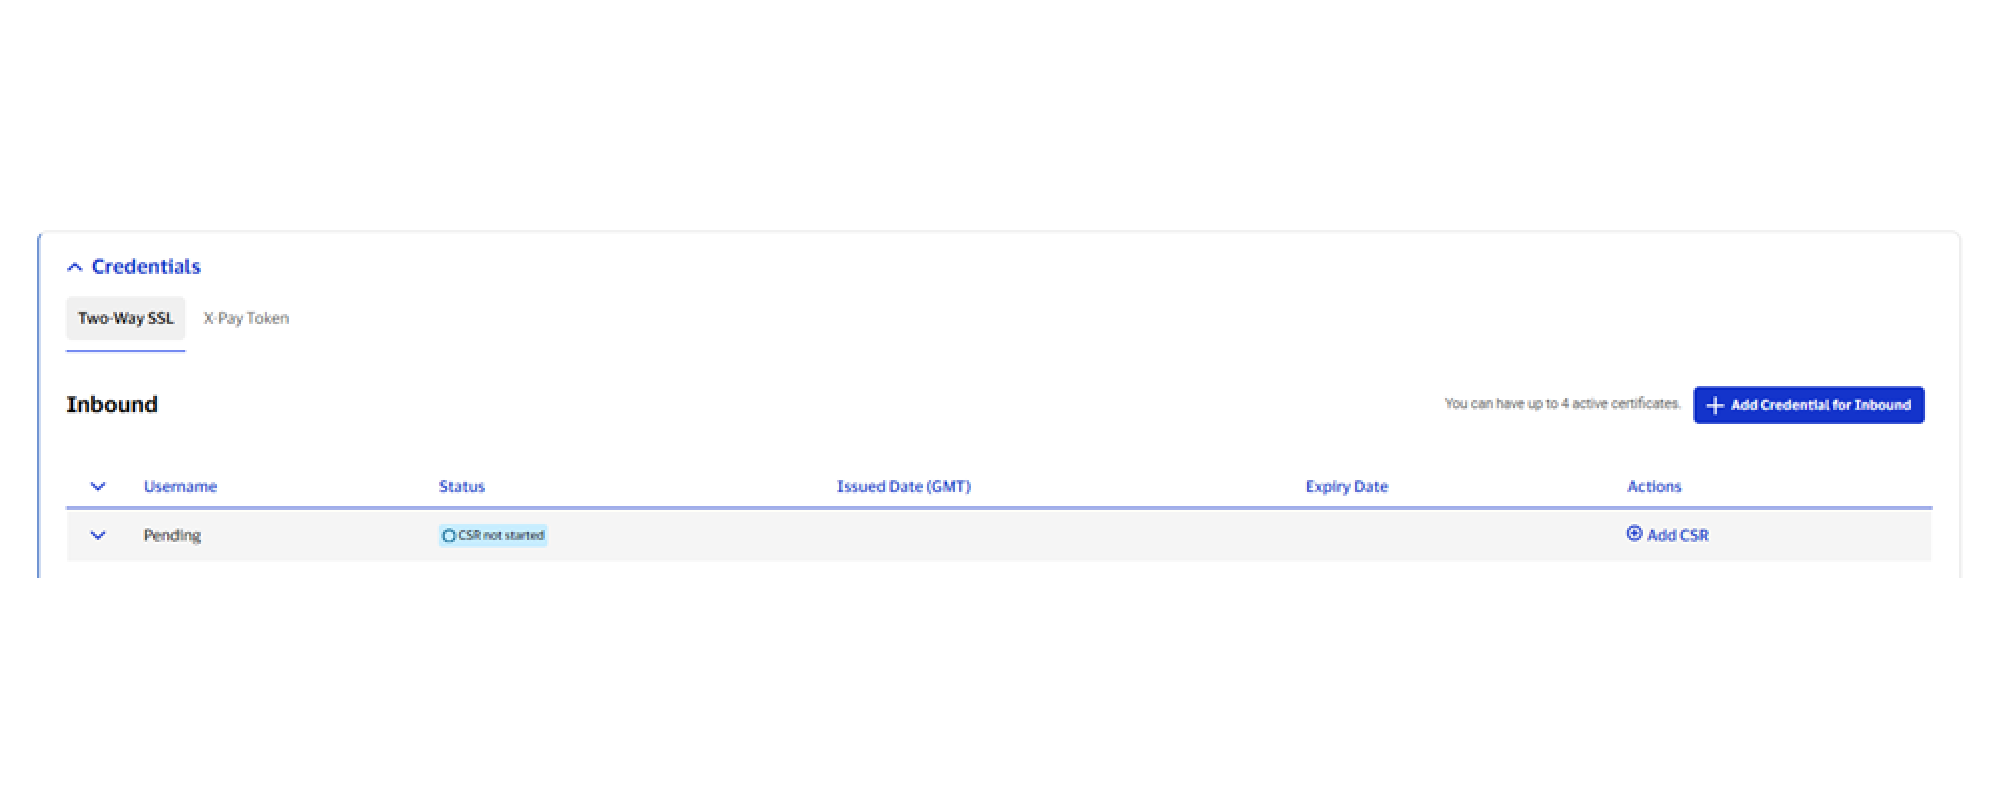
To obtain Two-Way SSL certificates, begin the process of generating a CSR.
- Open your project and select the environment.
- Go to Credentials > Two-Way SSL.
- Select Add Credential for Inbound.
The new inbound row appears with a Pending status.
Step 2: Generate a CSR
- In the new inbound row, select Add CSR.
- Follow detailed instructions for generating Certificate Signing Requests (CSRs) in your current environment.
- Upload and submit your CSR file.
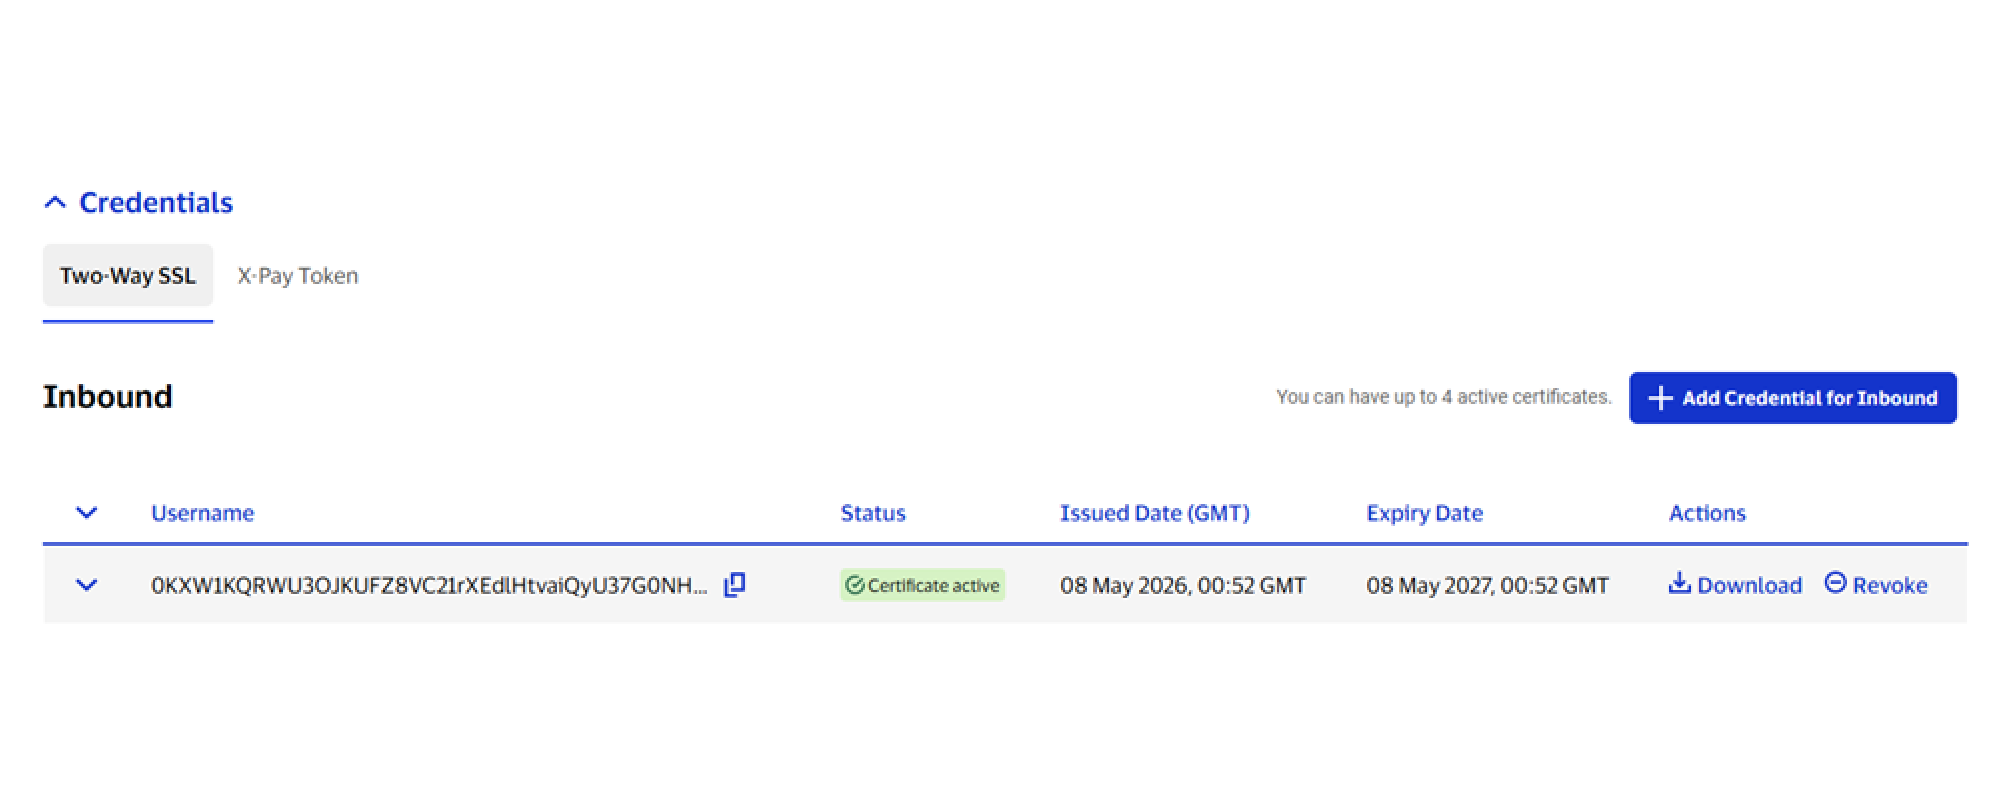
- After Visa issues the certificate, go to Credentials > Two-Way SSL to download your CA certificates specific to your environment.
Important: Follow the procedures below to configure your keystore and download the CA certificates for your environment.
Step 3: Configure keystore
Your application may read your private key and certificate from separate files or from a keystore file that contains both items.
- If you are using Java, your private key and certificate must be in a Java keystore (JKS) file. Follow the instructions below to configure the keystore for your environment.
- If you are using OpenSSL or a non-Java environment, you do not need a JKS file. Proceed with Configure keys in OpenSSL/Non-Java environments instructions below.
Configure keystore in OpenSSL/non-Java environment
Your application may use your private key and certificate as two separate files, or it may use a PKCS #12 file that contains both your private key and certificate.
1. If your application requires a PKCS #12 file, create a PKCS #12 file that contains your private key and certificate.
openssl pkcs12 -export -in cert.pem -inkey privateKey.pem -out myProject_keyAndCertBundle.p122. View the contents of your PKCS #12 file to check that it contains both the private key and the certificate.
openssl pkcs12 -info -in myProject_keyAndCertBundle.p12Once the contents are confirmed, proceed to Step 4: Review or set up truststore.
Configure Java Keystore (JKS) in Sandbox
How you configure a JKS in Sandbox depends upon the option you selected to generate your CSR in Step 2.
- If you selected Generate a CSR for me, Visa Developer generates your private key in PEM format. You must import this key into the JKS file before importing the CA certificates.
- If you selected Submit my own CSR, you import the CA certificates and then your client certificate into the JKS file.
Follow the instructions below depending on the option you selected.
Generate a CSR for me
1. Import the private key into a JKS file.
One way to do this is to use OpenSSL to place the private key and certificate in a PKCS #12 file, and then use Java Keytool to create a JKS file from the PKCS #12 file.
For example:
openssl pkcs12 -export -in cert.pem -inkey privateKey.pem -out myProject_keyAndCertBundle.p12

keytool -importkeystore -srckeystore myProject_keyAndCertBundle.p12 -srcstoretype PKCS12 -destkeystore clientkeystore.jks -srcalias 1 -destalias client2. View the contents of your new JKS file to check that it contains a PrivateKeyEntry and the certificate.
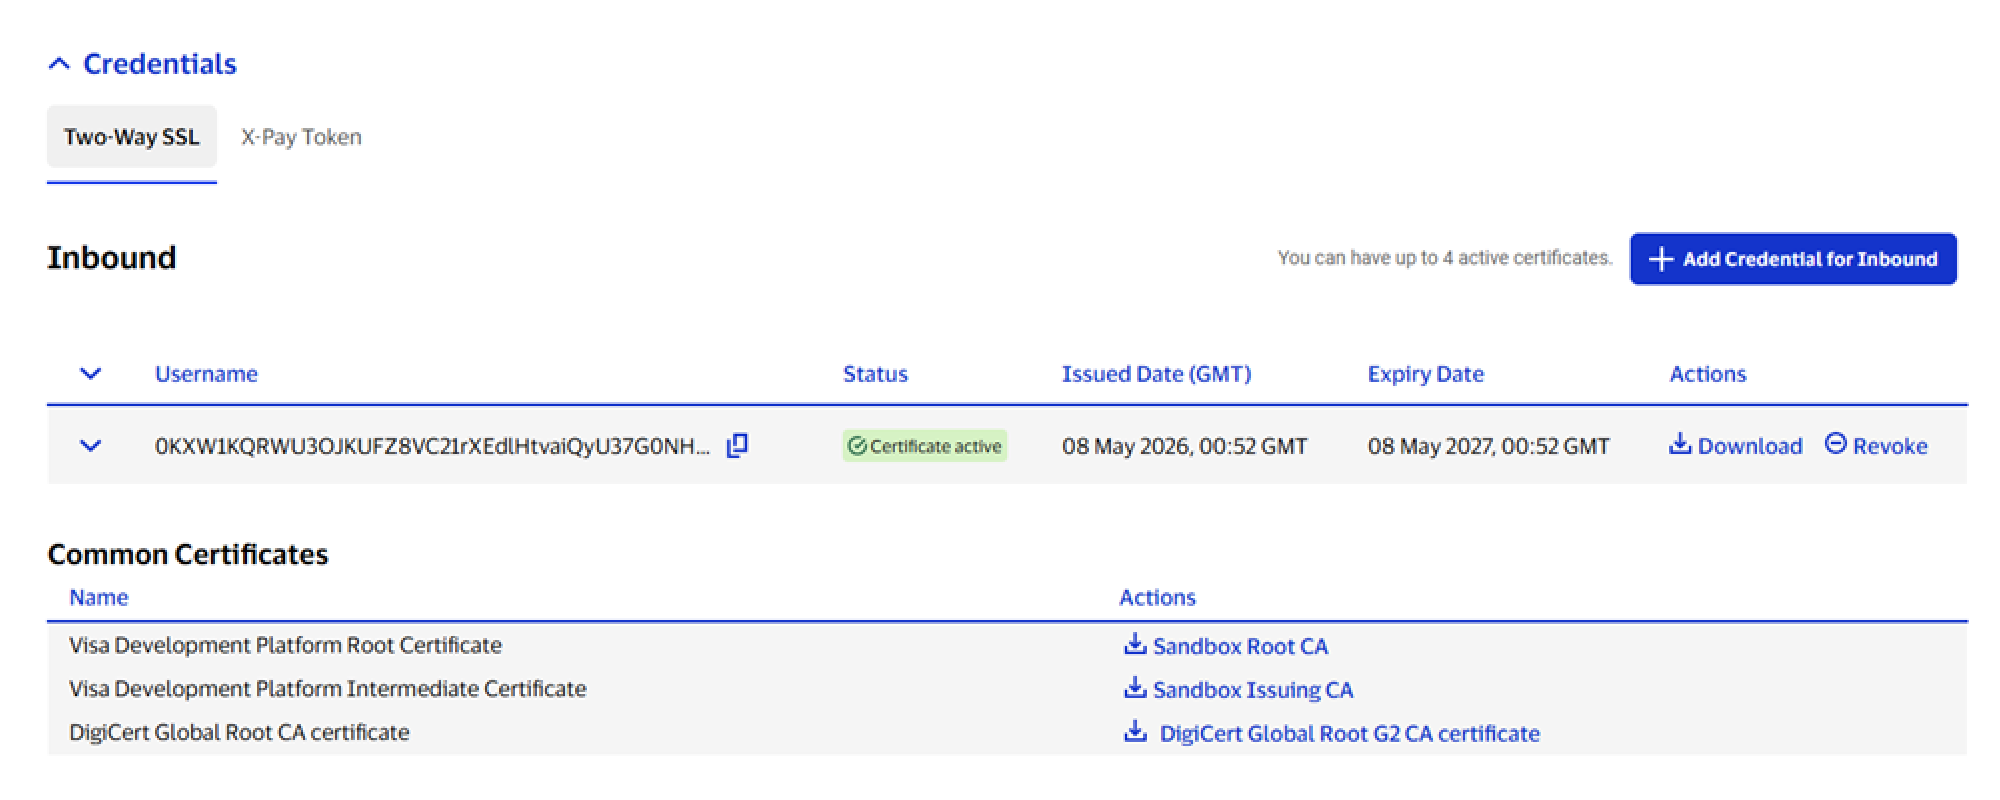
keytool -list -v -keystore clientkeystore.jks3. Download the Visa Developer Root Certificate (Sandbox Root CA) and Visa Developer Intermediate Certificate (Sandbox Issuing CA) from the Common Certificates section.
- Add the root CA certificate to your JKS file.
- Replace <password> with the keystore password that you specified when you created the JKS in the step above.
- Answer yes when prompted to trust this certificate.
keytool -import -alias sbxroot -keystore clientkeystore.jks -file SBX-2024-Non-Prod-Root.pem -storepass <password>
…
Trust this certificate? [no]:  yes
Certificate was added to keystore- Add the intermediate CA certificate to your JKS file.
- Replace <password> with the keystore password that you specified when you created the JKS in the step above.
- Answer yes when prompted to trust this certificate.
keytool -import -alias sbxinter -keystore clientkeystore.jks -file SBX-2024-Non-Prod-Inter.pem -storepass <password>
…
Trust this certificate? [no]:  yes
Certificate was added to keystoreSubmit my own CSR
- Add the CA certificates for your certificate chain to your JKS file by downloading the Visa Developer Root Certificate (Sandbox Root CA) and Visa Developer Intermediate Certificate (Sandbox Issuing CA) from the Common Certificates section (as shown in the image above).
- Add the root CA certificate to your JKS file.
- Replace <password> with the keystore password that you specified when you created the JKS in the step above.
- Answer yes when prompted to trust this certificate.
keytool -import -alias sbxroot -keystore clientkeystore.jks -file SBX-2024-Non-Prod-Root.pem -storepass <password>
…
Trust this certificate? [no]:  yes
Certificate was added to keystore- Add the intermediate CA certificate to your JKS file.
- Replace <password> with the keystore password that you specified when you created the JKS in the step above.
- Answer yes when prompted to trust this certificate.
keytool -import -alias sbxinter -keystore clientkeystore.jks -file SBX-2024-Non-Prod-Inter.pem -storepass <password>
…
Trust this certificate? [no]:  yes
Certificate was added to keystore4. Add your client certificate to your JKS file. Ensure you replace <password> with the keystore password that you specified when you created the JKS in the step above.
Note: The keystore file (clientkeystore.jks) and alias name (client) must be the same as what you specified earlier when you created the keystore file during Step 2: Generate a CSR.
keytool -import -alias client -keystore clientkeystore.jks -file cert.pem -storepass <password>5. View the contents of your new JKS file to ensure that it contains a PrivateKeyEntry and the certificate.
keytool -list -v -keystore clientkeystore.jksConfigure JKS in Certification or Production
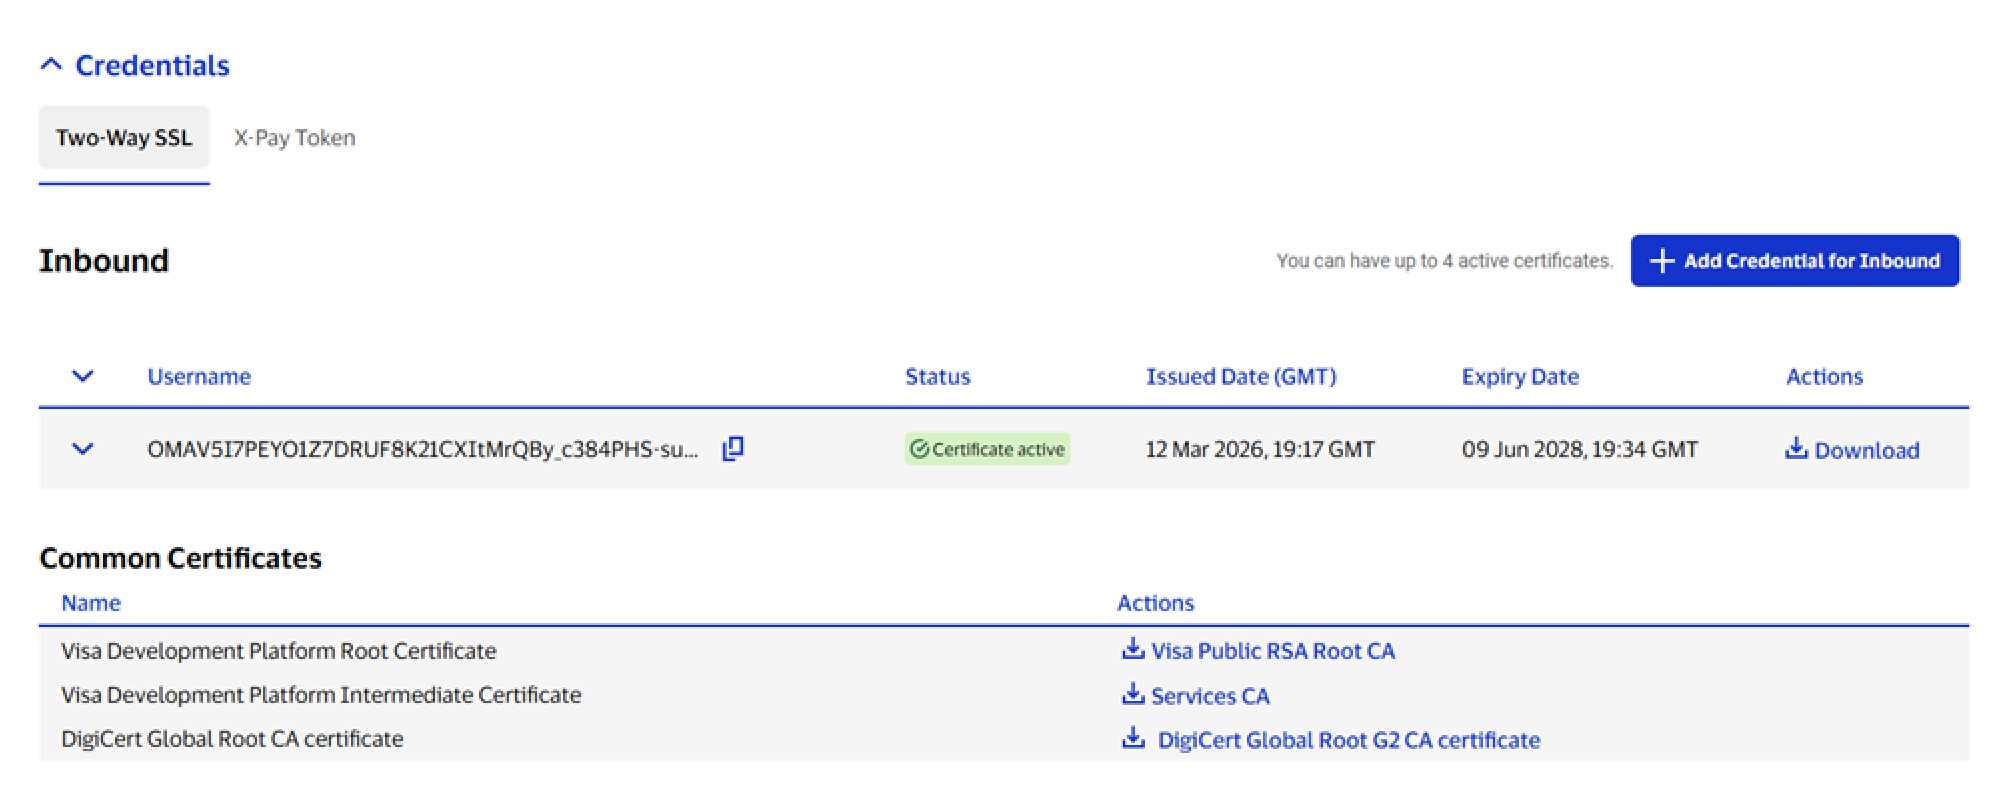
1. Download the Visa Developer Root Certificate (Visa Public RSA Root CA) and Visa Developer Intermediate Certificate (Services CA) from the Common Certificates section.
- Add the root CA certificate, intermediate CA certificate, and client (leaf) certificate to your JKS file.
- Replace <password> with the keystore password that you specified when you created the JKS in the step above.
- Answer yes when prompted to trust this certificate.
Note: The keystore file (clientkeystore.jks) and alias name (client) must be the same as what you specified earlier when you created the keystore file during the Step 2: Generate a CSR.
keytool -import -alias root -keystore clientkeystore.jks -file ServicesCARoot.pem -storepass <password>
…
Trust this certificate? [no]:  yes
Certificate was added to keystore

keytool -import -alias interm -keystore clientkeystore.jks -file ServicesCAInter.pem -storepass <password>

keytool -import -alias client -keystore clientkeystore.jks -file cert.pem -storepass <password>3. View the contents of your new JKS file to ensure that it contains a PrivateKeyEntry and the three certificates.
keytool -list -v -keystore clientkeystore.jksStep 4: Review or set up truststore
Ensure that your truststore is set up to trust the Visa Developer gateway domain server certificate. This ensures that the DigiCert Global Root G2 CA certificate is in your truststore.
The DigiCert Global Root G2 CA certificate is already in the default truststore for common operating systems and development environments.
If you are using a truststore that does not include the DigiCert Global Root G2 CA certificate, download it from Credentials > Two-Way SSL > Common Certificates and add it to your truststore.
For Java, specify a JKS file as the truststore by adding DigiCert Root CA to your truststore file. Answer yes when prompted to trust the root certificate.
keytool -import -alias digicertRoot -keystore <truststore file> -file DigiCertGlobalRootG2.crt.pem
…
Trust this certificate? [no]:  yes
Certificate was added to keystoreStep 5: View HTTP Basic Authentication credentials
When you use Two-Way SSL with Visa Developer, there is a corresponding HTTP Basic Authentication username and password that you send in addition to the certificate when you make API calls.
- Go to Credentials > Two-Way SSL.
- Expand the row showing the HTTP Basic Authentication username and view the masked password.
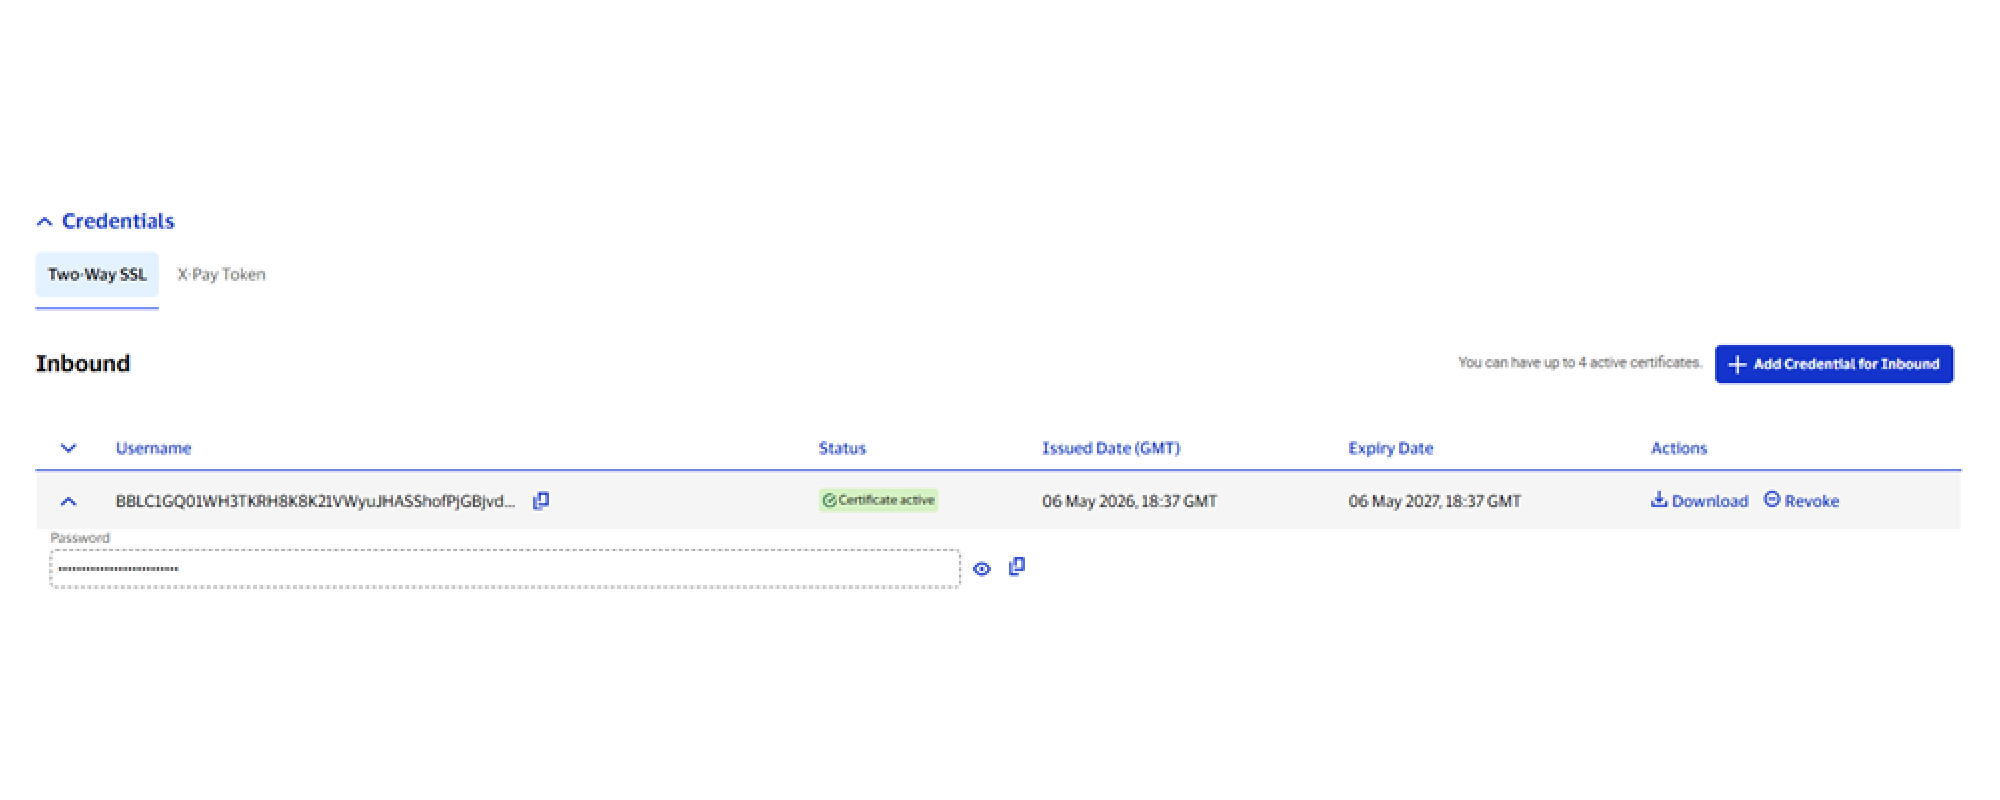
Ensure you include the Authorization: Basic header in your HTTP request when you make API calls. The value of the header is the base64-encoding of the username and password separated by a colon.
For example: Authorization: Basic R0ZUFBFTjVaTEUy
Note: When you use API testing tools like Postman, you only need to input the HTTP Basic Authentication username and password. The tool will build the Authorization header. Review details in the testing guide.
Code samples
These samples show how to build the Authorization header in your application using common programming languages. See complete code samples, including Hello World, in the Onboarding Dashboard under Assets > General Assets > Sample Code.
import javax.net.ssl.SSLContext;
import org.apache.http.conn.ssl.SSLConnectionSocketFactory;
import org.apache.http.impl.client.CloseableHttpClient;
import org.apache.http.impl.client.HttpClients;
import org.apache.http.ssl.SSLContexts;

// Load client certificate into keystore
SSLContext sslcontext = SSLContexts.custom()
        .loadKeyMaterial(new File(KEY_STORE_PATH), KEY_STORE_PASSWORD.toCharArray(),
                PRIVATE_KEY_PASSWORD.toCharArray())
        .loadTrustMaterial(new File(KEY_STORE_PATH), KEY_STORE_PASSWORD.toCharArray())
        .build();

// Allow TLSv1.2 protocol only
SSLConnectionSocketFactory sslSocketFactory = new SSLConnectionSocketFactory(sslcontext, new String[] { "TLSv1.2" }, null,
        SSLConnectionSocketFactory.getDefaultHostnameVerifier());

CloseableHttpClient httpClient = HttpClients.custom()
            .setSSLSocketFactory(sslSocketFactory).build();
import requests
r = requests.post(url,
verify = ('put the CA certificate pem file path here'),
cert = ('put the client certificate pem file path here','put the private key pem file path here'),
headers = headers,
auth = (user_id, password),
data = body)var request = require('request');
var req = request.defaults();
var fs = require('fs');
req.post({
uri : "https://Sandbox.api.visa.com/…",
key: fs.readFileSync(keyFile),
cert: fs.readFileSync(certificateFile),
ca: fs.readFileSync(caFile)
headers: {
'Content-Type' : 'application/json',
'Accept' : 'application/json',
'Authorization' : 'Basic ' + new Buffer(userId + ':' + password).toString('base64')
},
body: data
}, function(error, response, body) {
…
}
);require 'rest-client'
begin
response = RestClient::Request.execute(
:method => :post,
:url => url,
:headers => headers,
:payload => $body,
:user => user_id, :password => password,
:ssl_client_key => OpenSSL::PKey::RSA.new(File.read(key_path)),
:ssl_client_cert => OpenSSL::X509::Certificate.new(File.read(cert_path)),
:ssl_ca_file => ca_cert_path
)
rescue RestClient::ExceptionWithResponse => e
response = e.response
endusing System.Net;
using System.Security.Cryptography.X509Certificates;
HttpWebRequest request = WebRequest.Create (requestURL) as HttpWebRequest;
// Add headers
string authString = userId + ":" + password;
var authStringBytes = System.Text.Encoding.UTF8.GetBytes (authString);
string authHeaderString = Convert.ToBase64String (authStringBytes);
request.Headers ["Authorization"] = "Basic " + authHeaderString;
// Add certificate
var certificate = new X509Certificate2(p12certificatePath, p12certificatePassword);
request.ClientCertificates.Add(certificate);$authString = $userId.":".$password;$authStringBytes = utf8_encode($authString);
$authloginString = base64_encode($authStringBytes);
$authHeader= "Authorization:Basic ".$authloginString;
$header = (array("Accept: application/json", "Content-Type: application/json", $authHeader));
$ch = curl_init();
curl_setopt($ch, CURLOPT_HTTPHEADER, $header);
curl_setopt($ch, CURLOPT_SSLCERT, $certificatePath);
curl_setopt($ch, CURLOPT_SSLKEY, $privateKey);
curl_setopt($curl, CURLOPT_CAINFO, $caFile);Step 6: Test Two-Way SSL connectivity
Learn more about testing Two-Way SSL connectivity in the testing guide.
Need help?
Find answers in our FAQs or get support from a Visa Developer expert.