| Phase 1: Onboarding | Phase 2: Integration | Phase 3: Certification Testing | Phase 4: Going Live |
|---|---|---|---|
1. Open Project: Open a Click to Pay Project. You must agree to both:
You can optionally enter your Business Entity (listed in Requirement 3) when opening the project, before Sandbox testing. |
Work on Requirements 3 and 4 in parallel with Requirement 2 to avoid delays. 2. Complete Tests: Implement and complete test cases in the VDC Sandbox for each API you want to certify. 3. Valid Business Entity: If not already completed, enter a Business Entity in the project and pass the compliance checks. 4. Certification Request: Request to start Certification and complete the Click to Pay Solution-Description Intake Form. |
Start working on Requirements 5, 8, 9, 10, and 11 as early as possible during your implementation project, even during Integration, to avoid delays. 5. Sign VDCP Agreement: Submit Signed Visa Digital Commerce Program (VDCP) Agreement. 6. Open Project in Partner Portal: Open a Click to Pay project in the Visa Partner Portal (to enable submission of certification documentation). 7. Submit Test Results: Complete and submit mandatory and conditional test cases for the APIs requiring certification. 8. PCI DSS Attestation: Complete and submit the PCI DSS Attestation of Compliance (AOC). 9. Submit Architecture Design: Submit a network diagram/ topology and architecture overview including the protocols used 10. Submit evidence of your CX implementation: Submit end to end journey video, screenshots, or Figma demonstrating all requirements (including branding requirements). 11: Submit Solution Design:Submit any other documents (as agreed with your solution or implementation manager) that were used to review/approve your solution if it deviates from standard requirements. 12. Submit Certification Checklist: Submit Completed "Visa Click to Pay Solution Certification Checklist" |
After you are promoted to the Production environment, Visa highly recommends validating with real API requests before mass rollout or commercial launch. |
This section covers the initial setup steps that project managers need to complete to
establish a
Familiarize yourself with the overall process by visiting the Quick Start Guide for Business Users.
Create a Visa Developer Account
Create a Visa Developer account, or skip to the next step if you already have one.
Create a Click to Pay Project
Log in to your developer account.
In the Dashboard page of your account, create a Click to Pay project by clicking Add New Project on the right side.
If you've never created a project with Visa before, the right side button will read: Create your first project
Give your project a name and write a short project description.
Take note of the project name as you'll need to share it with your development team later. For example, you can input the following information:
If your account is already associated with at least one Business Entity, you will see the Add Business Entity section when creating a project and will be asked to select the Business Entity name from the drop-down list.
Entering a value to access Sandbox testing is entirely optional at this stage, so you can skip this step and return later if you're unsure of the value to use.If your account isn't yet associated with a Business Entity, you won't have the option to enter a Business Entity now (the Business Entity section won't be visible). You'll have the option to add the Business Entity information in your project dashboard after you finish creating the project.
The business entity name is required before you can move to the Certification Environment and requires approval, so enter it as early as possible in the process to avoid delays. When ready, refer to step one in Project Management: Administrative Preparation Before Certification for how to add the Business Entity to the project.
In the Add Product section of the Dashboard, click on the drop-down list in the Select Product section, select Click to Pay, and click Submit.

8. Notify Development Team
Advise your developers that they can now access the project to create required credentials and keys and start implementing and testing in Sandbox. Let them know the project name. You can return to this section of the Dashboard at any time to add new users.
Once a Click to Pay project is open in the Visa Developer Center, you can begin implementation and testing.
Access Your Developer Account
Create or Log in to your developer account. On the Dashboard page, select the your Click to Pay project that your project manager created.
Get Your APIs
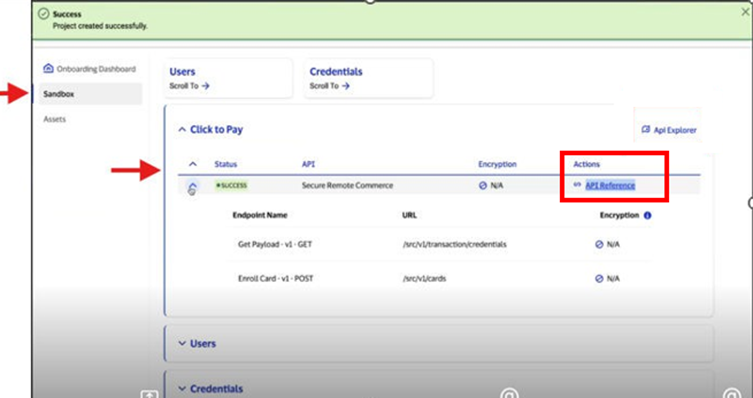
Navigate to Sandbox in the left menu of the Dashboard. In Sandbox, expand Click to Pay to view available APIs and their URLs. Click API References to view the available APIs.
Set up Your Sandbox Credentials
Go to the Credentials section to create your authentication credentials. The Visa Click to Pay API requires X-Pay Token authentication. You cannot select Two-Way SSL for this API, as shown in the onboarding dashboard. Refer to the X-Pay Token documentation for setup details.
Some Click to Pay APIs require Field Level Encryption and certificate signing for decryption. Find the required keys in the Asset section in the left menu. In Sandbox, these keys are the same for all clients.
Sandbox Implementation and Testing
The Visa Click to Pay Sandbox environment is powered by a simulator. It is not connected to any live Click to Pay backend systems, and no real-time processing is performed by any Visa production or certification system.
This means you can start building and testing immediately in a fully isolated environment with no dependency on live Visa systems.
Before testing, refer to the relevant section of this guide to implement the required Click to Pay APIs using your Project (API) Keys. After your initial implementation is complete, use the sandbox environment to validate your integration.
Visa Click to Pay test cases and test data for the sandbox are located in the Asset section of the left menu. These test cases correspond to scenarios you'll need to complete successfully in the Certification environment to obtain solution approval. Use Sandbox to confirm that your implementation behaves as expected and that you're prepared for Certification.
General details on testing in Sandbox are located in the Project Testing and Production Validation section of the Visa Developer Quick Start Guide.
For each test case, you must conform to the listed preconditions and use the exact test data provided in the Asset section. The Sandbox environment follows a strictly deterministic model: it returns a predefined response only when the exact expected request and test data are submitted. Any other data used in API requests will result in the Sandbox returning an error message. For example:When you are satisfied that the implementation is ready for official certification, discuss with your project manager about accessing the Certification environment. Plan ahead, as access to this environment may take around 3-5 business days.
For a complete testing how-to, see Calling Your First API.
While developers implement and test implementation and testing in Sandbox is in progress, plan ahead by reviewing all requirements you must meet before accessing the Certification environment. This includes entering a Business Entity and progressing your PCI DSS assessment if not already completed.
When you are confident that your organization is ready to move forward with Certification Testing for the required APIs, you can start with the Going Live steps of the Quick Start guide. Remember the information provided on pricing provided in the Quick Start Guide for Business Users.
1. Request Access to Certification Environment
1.1. Business entity
If you have not yet entered a Business Entity, you will have to do so at this point by clicking Start in the Business Entity section. A Visa staff member will need to approve this Business Entity

If the approved business entity doesn't have a primary contact, then you may need to fill out a Business Entity Contact form, which will appear in the project dashboard below the approved Business Entity Information form.
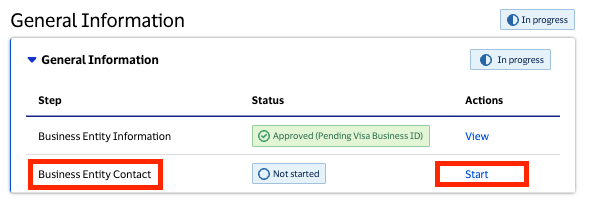
If the approved business entity already has a primary contact, then the Business Entity Contact form will appear auto-populated and auto-approved.
1.2 Request to start the next environment
Go to the Request to Start the Next Environment section of your project Dashboard.
Click Start to the right of Project Information, fill out the required information, and submit. This section is hidden until your business entity is approved. If you recently submitted the information, wait for the approval email before proceeding.
Click Start to the right of Click to Pay:
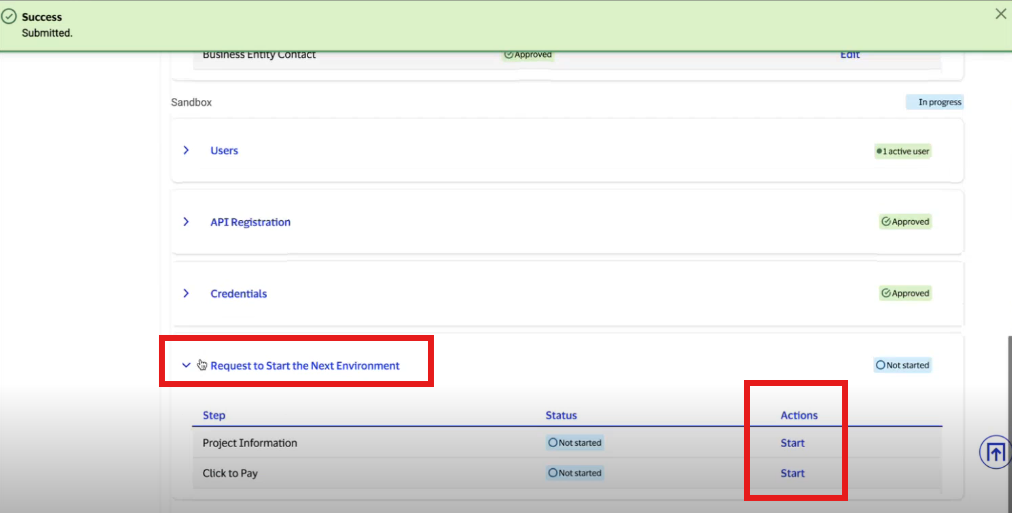
Select Secure Remote Commerce in the API list.
Respond to the other questions and submit.

2. Key Documentation Review
The Implementation manager will contact you to set up a kick-off call and share a Solution Description intake form that you will have to fill out and return prior to the call.
Note: If you have been working with a Visa solution manager, you may have previously filled out this form already, return that one.
During the call the implementation manager may ask questions to fully understand your solution and will share and go over the documentation that will be required at the end of the certification phase before final solution approval. You (and your developers as appropriate) should review these to be familiar with all requirements the solution will have to meet to avoid later delays in solution approval.
Once the Certification environment is available and your back-end development is ready for testing, you can begin certification testing (see Preparing for Certification on how to request access to the Certification environment).
Start by creating credentials for the Certification environment.
In your VDP project, go to the Credential section, complete a one-time passcode verification before the credentials appear. Follow the on-screen steps to complete this process.
If you see the message "Check back in a couple of days," the Implementation manager hasn't finished setting up the credentials on
Once the credentials are available, follow the same process you used in the Sandbox to set up the
Find the required certification test cases in the Asset section of your project. The test cards for Certification testing are also located in the Asset section.
Complete Certification Testing
Test using the
Once you have completed this step, proceed with all other required and conditional certification test cases. For any issues during certification testing, email [email protected] or speak with your
For each completed test case, fill out results in the Certification test case asset form. When completed, provide this form to your organization's project manager for submission into the
Wait for confirmation from your organization project manager or Visa project manager that certification is completed and the Production environment is available.
As the documents that will be required for solution approval (listed below) become available, email them to your implementation manager to speed up their review process.
Before requesting to move to Production:
After completing all the above requirements, complete and upload the Visa Click to Pay Certification Checklist provided by your appointed Visa Implementation Manager.
After you upload all required documents to the
Once the Production environment is live (as shown in the project dashboard),
To validate your implementation:
You must perform this validation with real cards and usernames.
For any issues during Production validation testing, speak with your
When completed, input the results of the validation performed in the validation in
Production Asset Form, and submit to
 Start a Project